Calico Cloud Free Tier quickstart guide
Get Calico Cloud running on a local Kind cluster, deploy a realistic microservices app, and explore your live Service Graph — all in a few minutes.
Before you begin
- Sign up for a Calico Cloud Free Tier account.
- Install Kind, Docker, and kubectl.
Step 1: Create a Kind cluster
-
Create a file called
kind-config.yaml:kind: ClusterapiVersion: kind.x-k8s.io/v1alpha4nodes:- role: control-plane- role: worker- role: workernetworking:disableDefaultCNI: truepodSubnet: 192.168.0.0/16This tells Kind to create a three-node cluster without a default CNI, so you can install Calico in the next step.
-
Create the cluster:
kind create cluster --name=calico-cluster --config=kind-config.yaml -
Verify the nodes are up (they'll show
NotReadyuntil Calico is installed):kubectl get nodesExpected outputNAME STATUS ROLES AGE VERSIONcalico-cluster-control-plane NotReady control-plane 60s v1.29.2calico-cluster-worker NotReady <none> 40s v1.29.2calico-cluster-worker2 NotReady <none> 40s v1.29.2
Step 2: Install Calico
-
Install the Tigera operator and custom resource definitions:
kubectl create -f https://raw.githubusercontent.com/projectcalico/calico/v3.32.0/manifests/tigera-operator.yaml -
Install Calico Cloud by creating the necessary custom resources:
kubectl create -f https://raw.githubusercontent.com/projectcalico/calico/v3.32.0/manifests/custom-resources.yaml -
Wait for all components to become available:
watch kubectl get tigerastatusAfter a few minutes, all components should show
Truein theAVAILABLEcolumn.Expected outputNAME AVAILABLE PROGRESSING DEGRADED SINCEapiserver True False False 4m9scalico True False False 3m29sgoldmane True False False 3m39sippools True False False 6m4swhisker True False False 3m19s
Step 3: Connect to Calico Cloud Free Tier
-
In the Calico Cloud web console, click Connect a cluster.
-
Follow the prompts to name your cluster (for example,
quickstart-cluster) and copy the generatedkubectlcommand.What's happening in this command?
This command creates three resources in your cluster:
- A
ManagementClusterConnectionresource. This resource specifies the address of the Calico Cloud management cluster. - A
Secretresource (tigera-managed-cluster-connection). This resource provides certificates for secure communication between your cluster and the Calico Cloud management cluster. - A
Secretresource (tigera-voltron-linseed-certs-public). This resource provides certificates for secure communications for the specific components that Calico Cloud uses for log data and observability.
- A
-
Run the
kubectlcommand in your terminal. -
Back in the console, click I applied the manifest. When the Managed Clusters page shows your cluster as Connected, move to the next step.
Step 4: Deploy the demo app
This step deploys Google's Online Boutique, a microservices demo with 12 services. Each service is deployed in its own namespace so that Service Graph displays a rich cross-namespace topology with realistic traffic patterns.
-
Deploy the application:
kubectl apply -f https://docs.tigera.io/files/online-boutique-namespaced.yamlnoteThe manifest includes a load generator that automatically drives traffic between all services. No manual traffic generation is needed.
-
Wait for all pods to reach
Runningstatus:watch "kubectl get pods -A | grep -v Running | grep -v Completed"This may take 2–3 minutes. When the only output is the header line, all pods are ready.
What's in the demo app?
The Online Boutique is a cloud-native e-commerce app made up of 12 microservices:
adservice,cartservice,checkoutservice,currencyservice,emailservice,frontend,loadgenerator,paymentservice,productcatalogservice,recommendationservice,redis-cart, andshippingservice.Each service runs in its own namespace. A built-in load generator continuously sends requests through the frontend, creating realistic traffic across all services.
Step 5: Explore Service Graph
In the Calico Cloud web console, go to Service Graph. Within a minute or two you'll see every service and namespace mapped as a live node, with directional traffic flows between them.
Try clicking on a service — for example, cartservice. You'll see:
- Which services send traffic to it (such as
checkoutserviceandfrontend) - Which services it connects to (such as
redis-cart) - Flow logs with details on allowed and denied connections
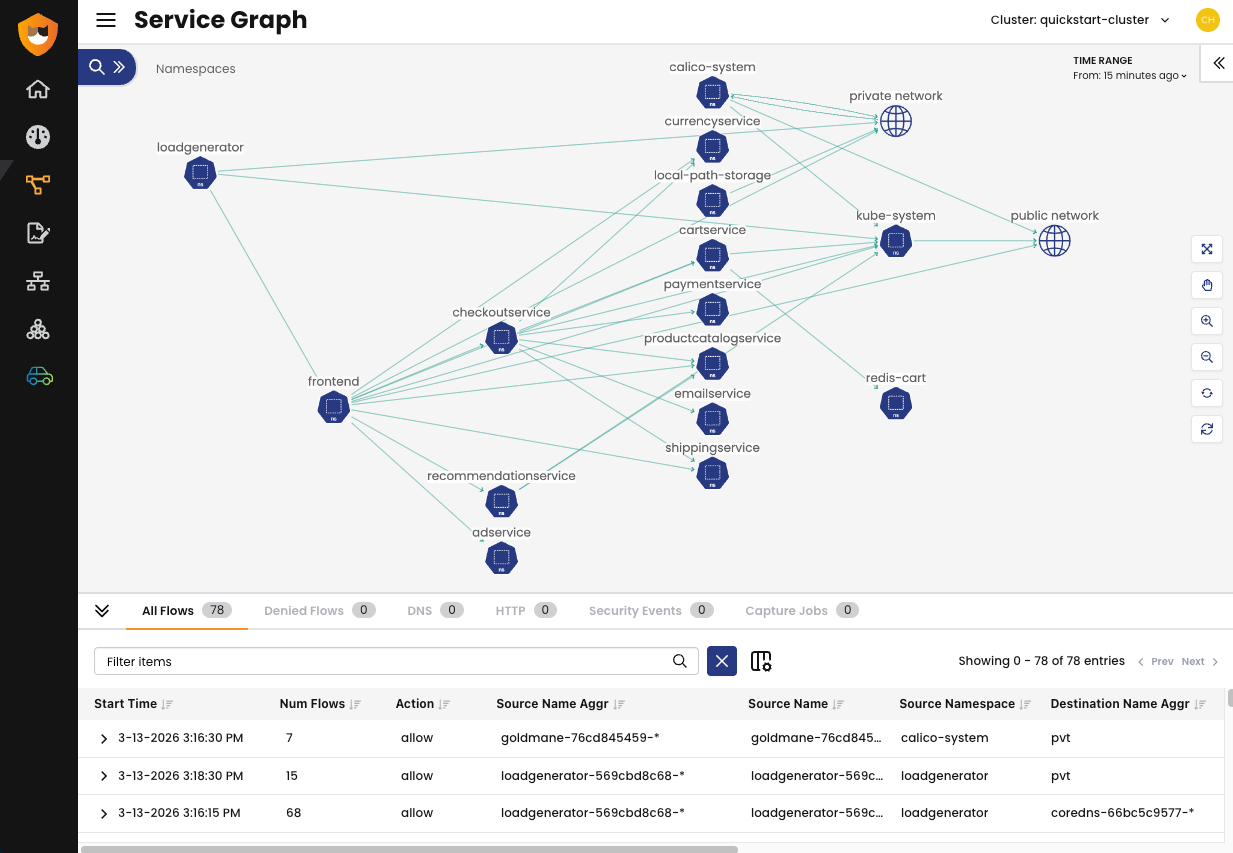
Figure 1: Service Graph showing cross-namespace traffic flows between the Online Boutique microservices.
Step 6: Clean up
-
Delete the Kind cluster:
kind delete cluster --name=calico-cluster -
In the Calico Cloud web console, go to Managed Clusters, click Actions > Disconnect, and then click I ran the commands. (Because you already deleted the cluster, you don't need to run the disconnect commands.)
-
Click Actions > Remove to fully remove the cluster from Calico Cloud.
Next steps
- Write a network policy to restrict traffic between services — for example, allow only
cartserviceto reachredis-cart. - Set up alerts for unexpected traffic patterns.
- Explore the full feature set available on the Free Tier.
- Connect another cluster to Calico Cloud Free Tier.