View scanned and running images
This feature was deprecated in Calico Cloud version 21.1.0 and will be removed in a future release. Availability depends on when you started using Calico Cloud.
- For users who started using Calico Cloud in April 2025 or later, this feature is not available.
- Legacy users, who started using Calico Cloud before April 2025, can continue to use this feature until it is removed in a future release.
The Images Assurance board in the web console provides lists for scanned images and running images.
In the left navbar in the web console, click Image Assurance, All Scanned Images.
All Scanned Images tab
This tab lists scanned images if you have enabled or used one of the Image Assurance scanners. To manage your scan results, you can filter, dismiss, or delete them:
- Filter: Apply different combinations of filters to refine your results, making it easier to focus on relevant vulnerabilities for remediation.
- Dismiss: Hide specific results from the scan results list. You can view a list of dismissed scan results by using the Dismissed filter.
- Delete: Permanently remove specific results from the scan results list.
Running Images tab
The tab lists active container images for all connected managed clusters. It provides the CVEs associated with running pods to help you assess pod vulnerability. This tab is disabled by default.
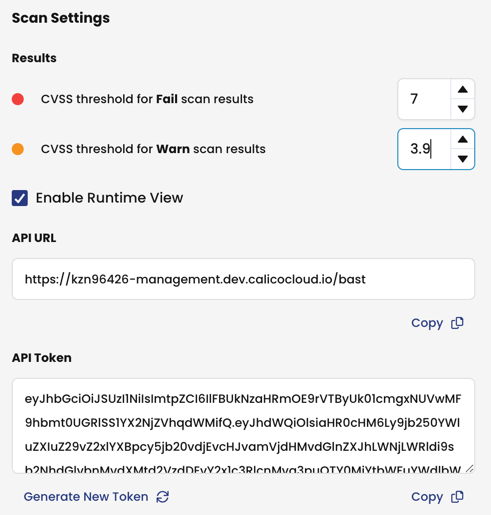
To enable Running Images, click the Setting icon in the top right corner, then select Enable Runtime View.
If you are using the CLI scanner and your cluster does not use the default containerd socket path (/run/containerd/containerd.sock), you must change the path to allow the Running Images service to collect image information. To update the CRI socket path for a cluster, run the following command:
kubectl patch imageassurance default --type='merge' -p '{"spec":{"criSocketPath":"<path-to-cri-socket>"}}'
For details, see the Image Assurance installation reference.
Other notes:
- The columns, Clusters and Running Instances, show the number of running instances in clusters that are connected to Calico Cloud.
- The Unknown scan result filter reflects images that are not fully scanned. Because they can add noise to the table, they are disabled by default. To enable Unknown results for strategic troubleshooting, click the Result drop-down menu and select Unknown.
- In the All Scanned Images and Running Images tabs, the Registry path field may be blank if Calico Cloud cannot access this metadata. For example, images from Docker Hub do not specify the registry in the image metadata.
- Any exceptions configured for image scanning will be applicable to Runtime View as well.
Image assessment: Pass, Warn, and Fail
The Image Assurance image assessment is based on the Common Vulnerability Scoring System v3 (CVSS Scores). The following table shows how Image Assurance scores map to CVSS scores.
| CVSS v3 scores | Image Assurance mapping | Default settings |
|---|---|---|
| 0.0 – (None) 0.1 – 3.9 (Low) | Pass = 3.9 | Low |
| 4.0 – 6.9 (Medium) | Warn = 7 | Medium severity – 7 |
| 7.0 – 8.9 (High) 9.0 – 10.0 (Critical) | Fail = 8.0 | Critical or high – 8 |
CVEs without a CVSS v3 score (too old to have one, or are too new to be assigned one), display a blank score in the UI, and N/A in the CLI.
Changing the default CVSS threshold values
The following default threshold values will work for the majority of Calico Cloud deployments. However, you may need to change the defaults because of security requirements.
To change the CVSS threshold values, note the following:
- Changes to threshold values take effect immediately and alter the scan results for images already in the system
- If you are using admission controller policies, changing a value may allow pods in your Kubernetes cluster that were previously being blocked, to now be deployed or vice versa.
Exploit Data
The scanning process also attaches EPSS and known exploit data onto each image and vulnerability viewable through the UI.
An EPSS score of 0.1 - or 10% - means a vulnerability has a 10% probability that it will be exploited in the wild within the next 30 days. Users should use this information alongside CVSS scores to prioritize remediating vulnerabilities. For example, you may not have the time to remediate all critical vulnerabilities, but you can use the EPSS score to help prioritize. By additionally filtering with an EPSS score of > 90% you can target the critical vulnerabilities that are most likely to be exploited.
Note that an EPSS score of > 10% can be considered a high number. Information about The EPSS Model can be found on the EPSS website created by FIRST.
Known exploits are based off of the CISA KEV Catalog, a list of vulnerabilities that have been exploited in the wild and maintained by CISA.
Export results
From each tab, you can export data or a JSON file with image URLs. Exporting data is based on the images in the list and the current filter selections. CSV table options include:
- Export one row per image - export one row for each image with all associated CVEs condensed into a single column.
- Export one row for each image and CVE ID - export a unique image plus CVE combination for each row. For example, if an image has 10 CVEs, 10 rows are created (1 for each CVE).
Images without associated CVEs are not included in the exported data (regardless if they are included by filters).