Network policy tutorial
What you will learn:
- How to create a policy in the web console
- How labels and selectors work
- Basics of policy ordering and tiers
Scenario
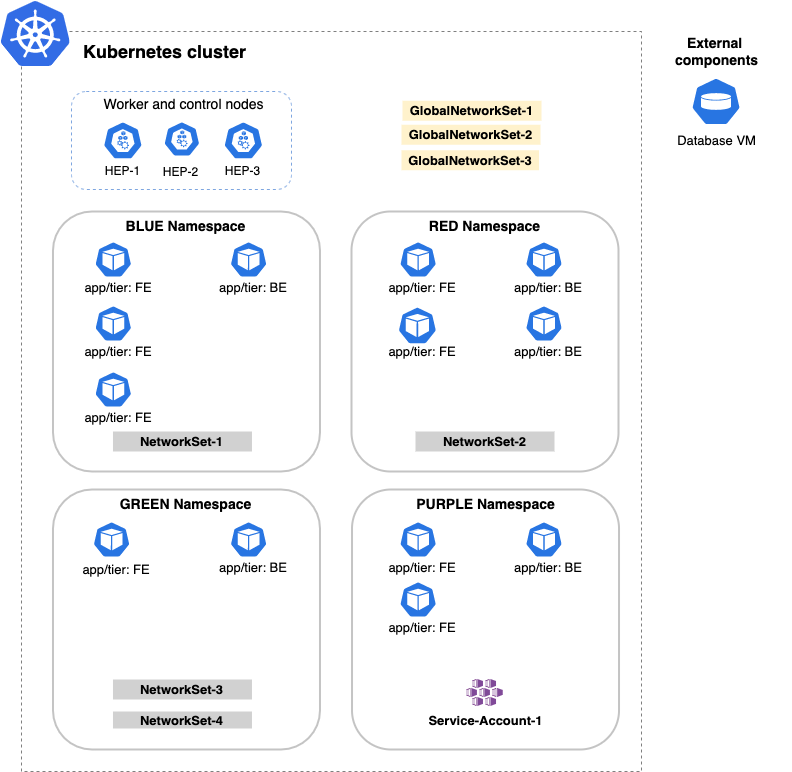
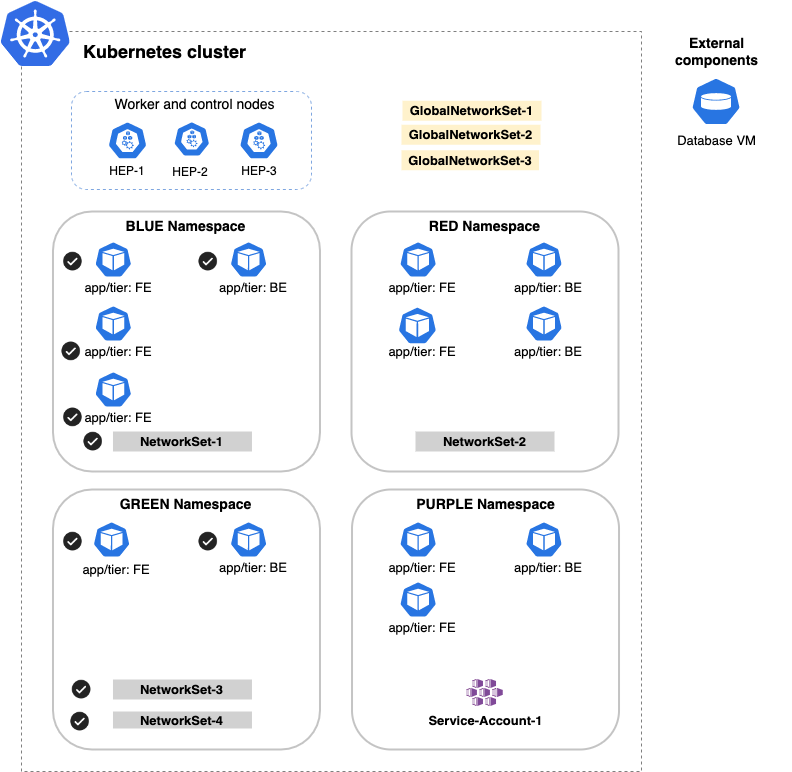
Let's start with a sample Kubernetes cluster.
| Item | Description |
|---|---|
| Kubernetes cluster | A Kubernetes cluster with four namespaces and three nodes that run the pods in the cluster. |
| Namespace | Four namespaces named blue, red, green, and purple represent different applications running in the cluster. |
| Pod | Pods with meaningful labels for our applications: - FE (frontend pods) - BE (backend pods) |
| NetworkSet | An arbitrary set of IP subnetworks/CIDRs or domains that can be matched by standard label selectors in Kubernetes or Calico Cloud network policy. Network sets are a Calico Cloud namespaced resource. |
| GlobalNetwork Set | An arbitrary set of IP subnetworks/CIDRs or domains that can be matched by standard label selectors in Kubernetes or Calico Cloud network policy. Global network sets are a Calico Cloud global resource. |
| ServiceAccount | Provides an identity for processes that run in a pod. Service accounts are a Kubernetes namespaced resource. |
| HostEndpoint (HEP) | Physical or virtual interfaces attached to a host that runs Calico Cloud. HEPs enforce Calico Cloud policy on the traffic that enters or leaves the host’s default network namespace through the interfaces. HEPs are a Calico Cloud global resource. |
| External component | A machine (physical or virtual) that runs outside of the Kubernetes cluster. |
Create a network policy
To follow along in the web console, click Policies.
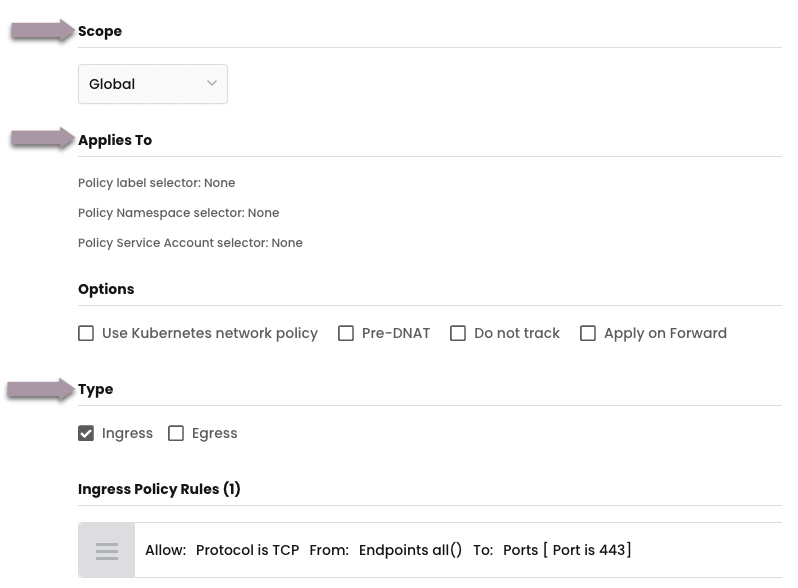
There are three main parts to every Calico Cloud policy:
- Scope - namespace or global
- Applies to - objects within the above scope to which policy rules will be applied using labels and selectors
- Type - whether this policy affects ingress, egress, or both
- Ingress - policy rules to apply to connections inbound to the selected objects
- Egress - policy rules to apply to connections outbound from the selected objects
Let's look at each part.
Scope
Scope defines the reach of your policy. Use this dropdown to determine whether your policy applies globally or to a specific namespace. Think of scope as the "top-level scope" that can be further specified using the "Applies to" selection that follows.
-
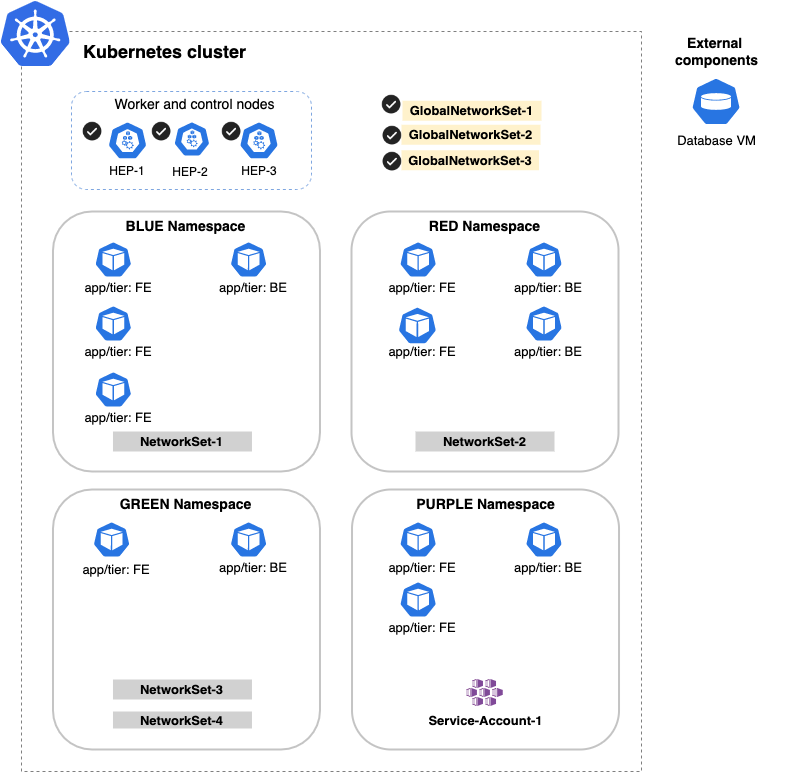
Global
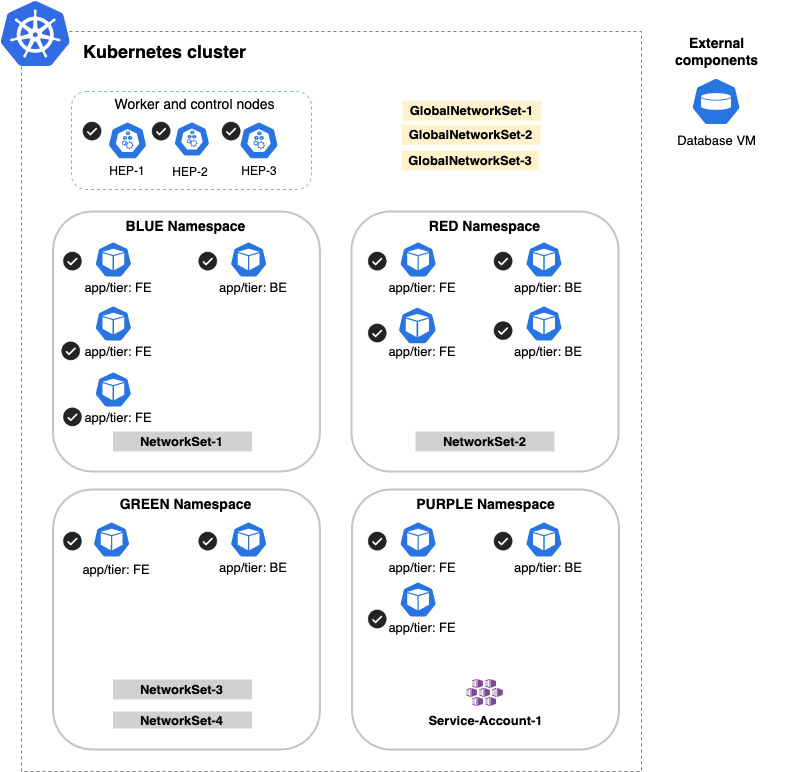
If you select global, but do not add entries in the Applies to field to further limit scope, every pod and host endpoint (HEP) in our cluster would be in scope. The following example uses the global option to limit the scope to all pods and HEPs (noted by check marks).
-
Namespace
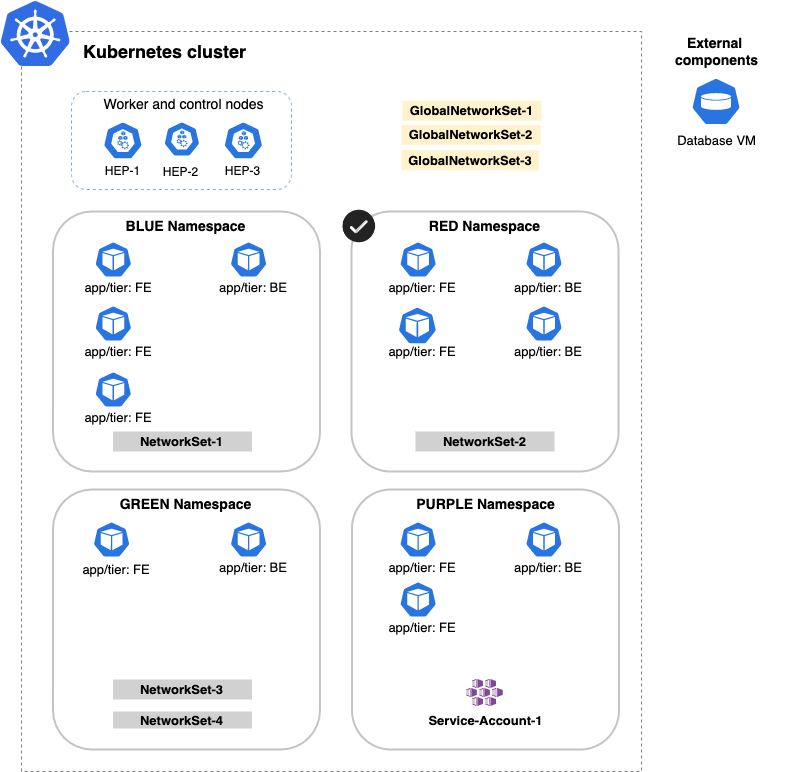
If you select namespace, but do not add entries in the Applies to field to further limit scope, every pod in this policy's namespace would be in scope. The following example uses the namespace option to limit the scope to pods in the RED namespace.
Applies to
As discussed above, selecting Applies to lets you further limit pods in a policy. You can think of it as the "top-level endpoint selector". You define labels on your endpoints, namespaces, and service accounts, then use label selectors to limit connections by matching the following object types:
-
Endpoints
Specify one or more label selectors to match specific endpoints, or select all endpoints
-
Namespaces (available only when the Scope is global)
Specify one or more label selectors to match specific namespaces, or select all namespaces
-
Service Accounts
Specify or more label selectors to match specific service accounts, or select all service accounts
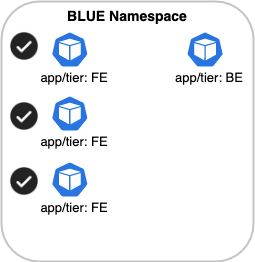
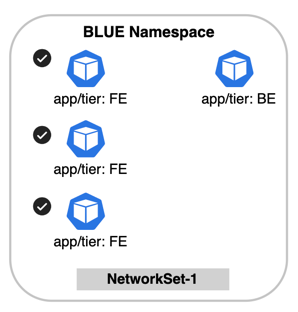
For example, if we select the BLUE namespace and apply it to only pods with the label, app/tier == FE,
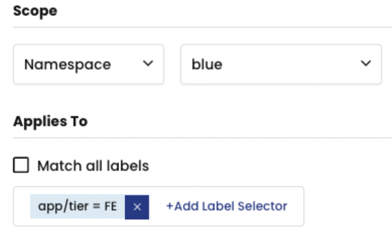
the resulting scope in our diagram would be only the pods labeled, FE:
Type
In the Type section, you specify whether the policy impacts ingress, egress, or both.
Note that ingress and egress are defined from the point of view of the scoped endpoints (pods or host endpoints). In the previous diagram, the scoped endpoints are the three pods labeled, app/tier:FE.
- Ingress rules filter traffic coming to the scoped endpoints
- Egress rules filter traffic leaving the scoped endpoints
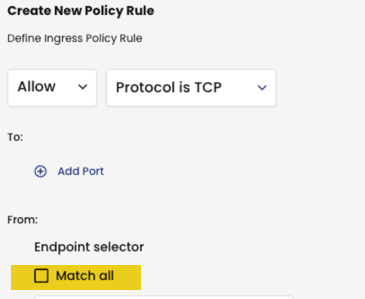
Select the Ingress rule, and click + Add ingress rule to access the Create New Policy rules page.
Endpoint selector
The endpoint selector lets you select the endpoint traffic that is matched within the scope you've defined in the policy.
In our example, the policy is scoped to endpoints that have the app/tier == FE label in the BLUE namespace. In the context of an egress rule, when we add the app/tier == BE endpoint selector, all TCP traffic from endpoints that have theapp/tier == BE label will be allowed to the app/tier == FE endpoints.
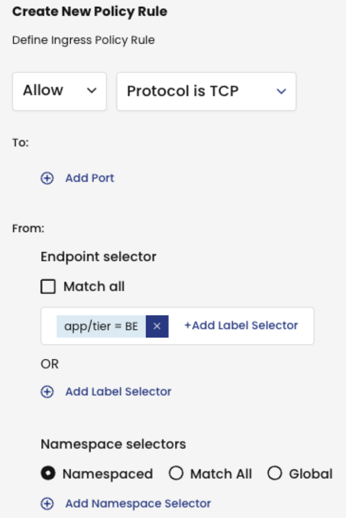
Note that endpoints that have the app/tier == BE label in other namespaces are not matched because the policy is namespace scoped.
Namespace selector
This is where things can get interesting. In the previous example, we did not select anything in the namespace selector. Let's change the namespace selector to have both the BLUE and GREEN namespaces.
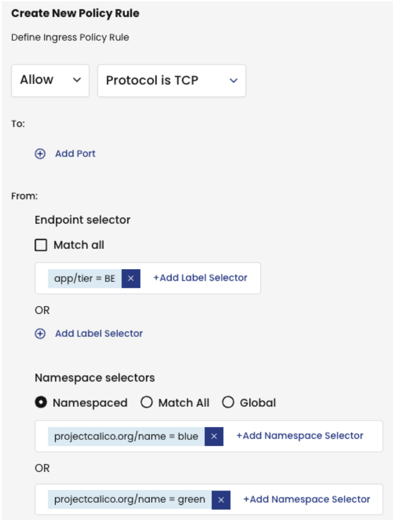
Although the overall policy is scoped to the BLUE namespace, we can match endpoints in other namespaces on a per-rule basis. Note that the top-level scope that you select remains unchanged, meaning that the policy is still applied only to endpoints in the BLUE namespace.

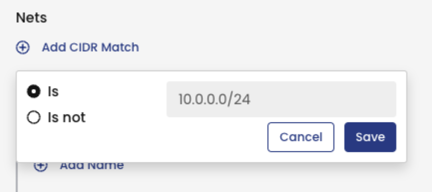
Network selector
Using the Nets selector, we can add CIDR addresses to be matched by the policy rule.
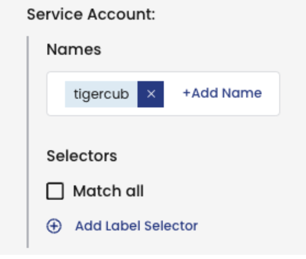
Service account selector
Network policies can be also applied to the endpoint’s service account.
Using the service account selector, we can apply rules to traffic from any endpoint whose service account matches the name or label selector.
Use Match All for wider matches in policy rules
The Match All policy rule (all() in YAML) matches traffic for:
- All endpoints in a namespace (if the policy scope is namespace)
- All endpoints (if the policy scope is global)
Let's look at an example of using Match All traffic in a namespaced policy:
- Scope is namespaced (BLUE)
- Applies to
app/tier == FE
Suppose we want to match traffic to the pod labeled BE, and the Calico Cloud networkset-1.
To do this, we can use the policy rule endpoint selector, Match All.
Not only is the pod labeled BE included, but also the Calico Cloud networkset-1.

Note that we could have created individual selectors to match pods labeled, BE and for the network-set-1.
Match All traffic with namespace selectors
In the following example, if we select Match All endpoints, but in the Namespace selector, we select both the BLUE and GREEN namespaces, the results for matching are: all pods and network sets in the BLUE and GREEN namespaces.
Global selector
Let's see what happens when we select the Global selector.

In our example, the Global selector selects HEPs and global network sets are selected. You might think that Global (global() in YAML) would select all endpoints, but it doesn't. Global means "do not select any namespaced resources" (which includes namespaced network set resources). Another way to express it is, do not select any workload endpoints.
Endpoint selector, unspecified
Next, let's see what happens when the policy rule does not specify any selection criteria. In this example, the rule selects all workloads, network sets, endpoints, and host endpoints within scope of the policy, including external components (the VM database).

Now that you know the basic elements of a network policy, let's move on to policy ordering and tiers.
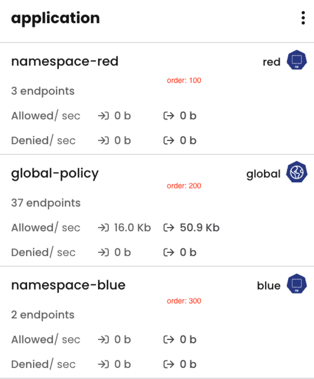
Policy ordering
Calico Cloud policies can have order values that control the order of precedence. For both network policies and global network policies, Calico Cloud applies the policy with the lowest value first.
Mixing Kubernetes and Calico Cloud policies
Kubernetes and Calico Cloud policies work side by side without a problem. However, Kubernetes network policies cannot assign an order value, so Calico Cloud will set an implicit order value of 1000 to any Kubernetes network policies.
Policies are immediately applied to any new connections. However, for existing connections that are already open, the policy changes will only take effect after the connection has been reestablished. This means that any ongoing sessions may not immediately reflect policy changes until they are initiated again.
Calico Cloud policies with no order value
Calico Cloud policies with order values take precedence. Policies without order values take lesser precedence and are processed alphabetically.
Tiers
Tiers are a hierarchical construct used to group policies and enforce higher precedence policies that cannot be circumvented by other teams. Access to tiers is controlled using user role permissions. For example, a security team can implement high-level policy (for example, blocking access to/from IP ranges in particular countries), while developers in a later tier can control specific rules for the microservices of an app running in the cluster.
Policy processing overview
When a new connection is processed by Calico Cloud, each tier that contains a policy that selects the endpoint processes the connection. Tiers are sorted by their order - the smallest number first. Policies in each tier are then processed in order from lowest to highest. For example, a policy of 800 is ordered before a policy of order 1000.
-
If a network policy or global network policy in the tier allows or denies the connection, then evaluation is done: the connection is handled accordingly.
-
If a network policy or global network policy in the tier passes the connection, the next tier containing a policy that selects the endpoint processes the connection
After a Pass action, if no subsequent tier contains any policies that apply to the pod, the connection is allowed.
If the tier contains policies that apply to the endpoint, but the policies take no action on the connection, the connection is dropped by an implicit deny.
If no tiers contain policies that apply to the endpoint, the connection is allowed by an implicit allow.
Policies with no order value
You can create policies without an order value. When a policy with no order value is placed in a tier with other policies that do have an order value, the policies are processed as follows:
- Policies are evaluated from smallest to largest order value within the tier
- Policies with no order value are processed last in the tier, but before the implicit deny
- When multiple policies without an order value are present in a tier, they are processed in alphabetical order. However, we do not recommended relying on alphabetical ordering because it hard to operationalize.
How policy action rules affect traffic processing
It is also important to understand that Calico Cloud policy action rules affect how traffic and connections are processed. Let's go back to the drop-down menu on the Create New Policy Rule page.
Action defines what should happen when a connection matches this rule.
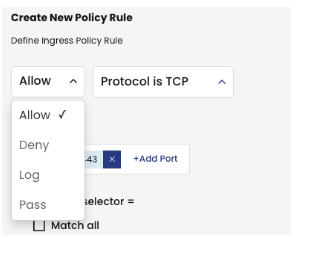
- Allow or Deny - traffic is allowed or denied and the connection is handled accordingly. No further rules are processed.
- Pass - skips to the next tier that contains a policy that applies to the endpoint, and processes the connection. If the tier applies to the endpoint but no action is taken on the connection, the connection is dropped.
- Log - creates a log, and evaluation continues processing to the next rule
Additional resources
The following topics go into further detail about concepts described in this tutorial: