Deploy a dual ToR cluster
Big picture
Deploy a dual plane cluster to provide redundant connectivity between your workloads for on-premises deployments.
Dual ToR is not supported if you are using BGP with encapsulation (VXLAN or IP-in-IP).
Value
A dual plane cluster provides two independent planes of connectivity between all cluster nodes. If a link or software component breaks somewhere in one of those planes, cluster nodes can still communicate over the other plane, and the cluster as a whole continues to operate normally.
Concepts
Dual plane connectivity, aka "dual ToR"
Large on-prem Kubernetes clusters, split across multiple server racks, can use two or more independent planes of connectivity between all the racks. The advantages are:
-
The cluster can still function, even if there is a single break in connectivity somewhere.
-
The cluster can load balance across the bandwidth of both planes, when both planes are available.
The redundant approach can be applied within each rack as well, such that each node has two or more independent connections to those connectivity planes. Typically, each rack has two top-of-rack routers ("ToRs") and each node has two fabric-facing interfaces, each of which connects over a separate link or Ethernet to one of the ToRs for the rack.
Here's an example of how a dual plane setup might look, with just two racks and two nodes in each rack. For simplicity, we've shown the connections between racks as single links; in reality that would be more complex, but still following the overall dual plane paradigm.
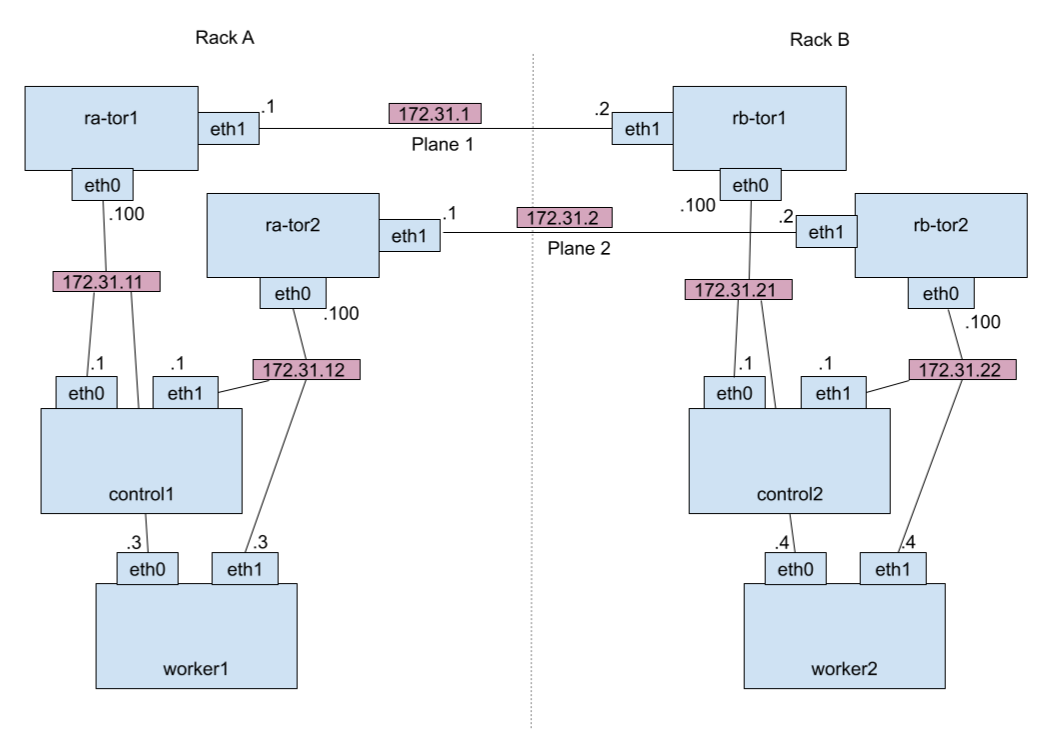
Because of the two ToRs per rack, the whole setup is often referred to as "dual ToR".
Network design for a dual ToR cluster
For a dual ToR cluster to operate seamlessly when there is a break on one of the planes, several things are needed.
-
Each node should have a stable IP address that is independent of its per-interface addresses and remains valid if the connectivity through one of those interfaces goes down.
-
Each node must somehow know or learn the stable IP address of every other node.
-
Wherever a connection (other than BGP) is to or from a node (as opposed to a non-host-networked pod), that connection should use the node's stable address as its destination or source IP (respectively), so that the connection can continue working if one of the planes has an outage.
-
Importantly, this includes connections that Kubernetes uses as part of its own control plane, such as between the Kubernetes API server and kubelet on each node. Ideally, therefore, the stable IP address setup on each node should happen before Kubernetes starts running.
-
BGP is an exception to the previous points - in fact, the only exception - because we want each node's BGP peerings to be interface-specific and to reflect what is actually reachable, moment by moment, over that interface. The Linux routing table then automatically adjusts so that the route to each remote destination is either ECMP - when both planes are up - or non-ECMP when it can only be reached over one of the planes.
-
BGP peerings should be configured to detect any outages, and to propagate their consequences, as quickly as possible, so that the routing can quickly respond on each node. Note that this is quite different from the reasoning for a single connectivity plane, where it's better to delay any network churn, on the assumption that an outage will be quickly fixed.
Finally, to spread load evenly and maximise use of both planes, when both available, the routers and Linux kernel need to be configured for efficient ECMP.
Calico's early networking architecture
Calico Cloud's cnx-node image can be run in an "early networking" mode, on each node, to perform all of the above points that are needed before Kubernetes starts running. That means that it:
-
Provisions the stable IP address, and assigns it to the loopback interface.
-
Ensures the stable address will be used as the source IP for any outgoing connections, by adjusting the scope of interface addresses.
-
Starts running BGP, peering with the node's ToRs, to advertise the node's stable address to other nodes.
-
Configures efficient ECMP in the Linux kernel (with
fib_multipath_hash_policy=1andfib_multipath_use_neigh=1).
More detail is given below on how to run this early networking image. A key point is that it must run as soon as possible after each node boot, and before Kubernetes starts on the node, so it is typically run as a Docker or podman container.
After its start-of-day provisioning, the early networking container keeps running so that it can tag-team the BGP role with Calico's regular BGP service running inside the cnx-node pod:
-
Initially the cnx-node pod does not yet exist, so the early networking BGP runs to advertise out the node's stable address.
-
After Kubernetes has started on the node, and Calico has been installed in Kubernetes, the cnx-node pod runs and starts its own BGP service. The early networking container spots that the regular BGP service is now running and so shuts down its own BGP. Now the regular BGP service handles the advertisement of the stable address, as well as pod IPs and so on.
-
Later, the cnx-node pod might be shut down, e.g. for restart or upgrade. If the downtime continues for longer than the graceful restart period, the early networking container spots this and restarts its own BGP, to ensure that the node's stable IP address continues to be advertised to other nodes. The cycle can now repeat from the "Initially" state above.
noteThe default graceful restart period is 120s for traditional BGP GR and 3600s for LLGR.
BGP configuration for rapid outage detection
A dual ToR cluster needs Calico BGPPeer resources to specify how each node should peer with its ToRs. The remaining parts of the dual ToR network design are implemented as properties of those BGP peerings, and as corresponding properties on the BGP configuration between and within the ToRs and core infrastructure.
Specifically, on Calico's BGPPeer resource,
-
the
failureDetectionModefield is used to enable BFD -
the
restartModefield can be used to enable long-lived graceful restart (LLGR).
See below for more on the benefits of these settings. When they are used, consistent settings are needed on the ToRs and core infrastructure.
ECMP routing
An "Equal Cost Multiple Path" (ECMP) route is one that has multiple possible ways to reach a given destination or prefix, all of which are considered to be equally good. A dual ToR setup naturally generates ECMP routes, with the different paths going over the different connectivity planes.
When using an ECMP route, Linux decides how to balance traffic across the available paths, including whether this is informed by TCP and UDP port numbers as well as source and destination IP addresses, whether the decision is made per-packet, per-connection, or in some other way, and so on; and the details here have varied with Linux kernel version. For a clear account of the exact options and behaviors for different kernel versions, please see this blog.
BFD
Bidirectional Forwarding Detection (BFD) is a protocol that detects very quickly when forwarding along a particular path stops working - whether that's because a link has broken somewhere, or some software component along the path.
In a dual ToR setup, rapid failure detection is important so that traffic flows within the cluster can quickly adjust to using the other available connectivity plane.
Long lived graceful restart
Long Lived Graceful Restart (LLGR) is an extension for BGP that handles link failure by lowering the preference of routes over that link. This is a compromise between the base BGP behaviour - which is immediately to remove those routes - and traditional BGP Graceful Restart behaviour - which is not to change those routes at all, until some configured time has passed.
For a dual ToR setup, LLGR is helpful, as explained in more detail by this blog , because:
-
If a link fails somewhere, the immediate preference lowering allows traffic to adjust immediately to use the other connectivity plane.
-
If a node is restarted, we still get the traditional Graceful Restart behaviour whereby routes to that node persist in the rest of the network.
Before you begin
Unsupported
- AKS
- EKS
- GKE
Required
- Calico CNI
How to
- Prepare YAML resources describing the layout of your cluster
- Arrange for dual-homed nodes to run cnx-node on each boot
- Configure your ToR routers and infrastructure
- Install Kubernetes and Calico Cloud
- Verify the deployment
Prepare YAML resources describing the layout of your cluster
-
Prepare BGPPeer resources to specify how each node in your cluster should peer with the ToR routers in its rack. For example, if your rack 'A' has ToRs with IPs 172.31.11.100 and 172.31.12.100 and the rack AS number is 65001:
apiVersion: projectcalico.org/v3kind: BGPPeermetadata:name: ra1spec:nodeSelector: "rack == 'ra' || rack == 'ra_single'"peerIP: 172.31.11.100asNumber: 65001sourceAddress: None---apiVersion: projectcalico.org/v3kind: BGPPeermetadata:name: ra2spec:nodeSelector: "rack == 'ra'"peerIP: 172.31.12.100asNumber: 65001sourceAddress: NonenoteThe effect of the
nodeSelectorfields here is that any node with labelrack: rawill peer with both these ToRs, while any node with labelrack: ra_singlewill peer with only the first ToR. For optimal dual ToR function and resilience, nodes in rack 'A' should be labelledrack: ra, butrack: ra_singlecan be used instead on any nodes which cannot be dual-homed.Repeat for as many racks as there are in your cluster. Each rack needs a new pair of BGPPeer resources with its own ToR addresses and AS number, and
nodeSelectorfields matching the nodes that should peer with its ToR routers.Depending on what your ToR supports, consider also setting these fields in each BGPPeer:
-
failureDetectionMode: BFDIfDirectlyConnectedto enable BFD, when possible, for fast failure detection.noteCalico Cloud only supports BFD on directly connected peerings, but in practice nodes are normally directly connected to their ToRs.
-
restartMode: LongLivedGracefulRestartto enable LLGR handling when the node needs to be restarted, if your ToR routers support LLGR. If not, we recommend insteadmaxRestartTime: 10s. -
birdGatewayMode: DirectIfDirectlyConnectedto enable the "direct" next hop algorithm, if that is helpful for optimal interworking with your ToR routers.noteFor directly connected BGP peerings, BIRD provides two gateway computation modes, "direct" and "recursive".
"recursive" is the default, but "direct" can give better results when the ToR also acts as the route reflector (RR) for the rack. Specifically, a combined ToR/RR should ideally keep the BGP next hop intact (aka "next hop keep") when reflecting routes from other nodes in the same rack, but add itself as the BGP next hop (aka "next hop self") when forwarding routes from outside the rack. If your ToRs can be configured to do that, fine. If they cannot, an effective workaround is to configure the ToRs to do "next hop keep" for all routes, with "gateway direct" on the Calico Cloud nodes. In effect the “gateway direct” applies a “next hop self” when needed, but otherwise not.
-
-
Prepare this BGPConfiguration resource to disable the full node-to-node mesh:
apiVersion: projectcalico.org/v3kind: BGPConfigurationmetadata:name: defaultspec:nodeToNodeMeshEnabled: false -
Prepare disabled IPPool resources for the CIDRs from which you will allocate stable addresses for dual-homed nodes. For example, if the nodes in rack 'A' will have stable addresses from 172.31.10.0/24:
apiVersion: projectcalico.org/v3kind: IPPoolmetadata:name: ra-stablespec:cidr: 172.31.10.0/24disabled: truenodeSelector: all()If the next rack uses a different CIDR, define a similar IPPool for that rack, and so on.
noteThese IPPool definitions tell Calico Cloud's BGP component to export routes within the given CIDRs, which is essential for the core BGP infrastructure to learn how to route to each stable address.
disabled: truetells Calico Cloud not to use these CIDRs for pod IPs. -
Prepare an enabled IPPool resource for your default CIDR for pod IPs. For example:
apiVersion: projectcalico.org/v3kind: IPPoolmetadata:name: default-ipv4spec:cidr: 10.244.0.0/16nodeSelector: all()noteThe CIDR must match what you specify elsewhere in the Kubernetes installation. For example,
networking.clusterNetwork.cidrin OpenShift's install config, or--pod-network-cidrwith kubeadm. You should not specifyipipModeorvxlanMode, as these are incompatible with dual ToR operation.natOutgoingcan be omitted, as here, if your core infrastructure will perform an SNAT for traffic from pods to the Internet. -
Prepare an EarlyNetworkConfiguration resource to specify the additional information that is needed for each node in a multi-rack dual ToR cluster:
- The stable address for the node.
- Its BGP AS number.
- The IPs that the node should peer with, when cnx-node runs as a container for early networking setup after each node boot.
- Any labels that the node should have, so as to match the right BGPPeer definitions for its rack, when cnx-node runs as a Kubernetes pod.
With OpenShift, also add a toplevel
platform: openshiftsetting.noteplatform: openshifttriggers additional per-node setup that is needed during OpenShift's bootstrapping phase.For example, with IP addresses and AS numbers similar as for other resources above:
apiVersion: projectcalico.org/v3kind: EarlyNetworkConfigurationspec:platform: openshiftnodes:# worker1- interfaceAddresses:- 172.31.11.3- 172.31.12.3stableAddress:address: 172.31.10.3asNumber: 65001peerings:- peerIP: 172.31.11.100- peerIP: 172.31.12.100labels:rack: ra# worker2- interfaceAddresses:- 172.31.21.4- 172.31.22.4stableAddress:address: 172.31.20.4asNumber: 65002peerings:- peerIP: 172.31.21.100- peerIP: 172.31.22.100labels:rack: rb... -
Prepare a ConfigMap resource named "bgp-layout", in namespace "tigera-operator", that wraps the EarlyNetworkConfiguration like this:
apiVersion: v1kind: ConfigMapmetadata:name: bgp-layoutnamespace: tigera-operatordata:earlyNetworkConfiguration: |apiVersion: projectcalico.org/v3kind: EarlyNetworkConfigurationspec:nodes:# worker1- interfaceAddresses:...
EarlyNetworkConfiguration supplies labels and AS numbers to apply to each Calico node, as well as peering and other network configuration to use during node startup prior to receiving BGPPeer and BGPConfiguration resources from the datastore. EarlyNetworkConfiguration will be superseded by any BGPPeer or BGPConfiguration resources after successful startup.
Arrange for dual-homed nodes to run cnx-node on each boot
Calico Cloud's cnx-node image normally runs as a Kubernetes pod, but for dual ToR setup it must also run as a container after each boot of a dual-homed node. For example:
podman run --privileged --net=host \
    -v /calico-early:/calico-early -e CALICO_EARLY_NETWORKING=/calico-early/cfg.yaml \
    quay.io/tigera/cnx-node:latest
The environment variable CALICO_EARLY_NETWORKING must point to the
EarlyNetworkConfiguration prepared above, so that EarlyNetworkConfiguration YAML must be
copied into a file on the node (here, /calico-early/cfg.yaml) and mapped into the
cnx-node container.
We recommend defining systemd services to ensure that early networking runs on each boot, and before kubelet starts on the node. Following is an example that may need tweaking for your particular platform, but that illustrates the important points.
Firstly, a "calico-early" service that runs the Calico early networking on each boot:
[Unit]
Wants=network-online.target
After=network-online.target
After=nodeip-configuration.service
[Service]
ExecStartPre=/bin/sh -c "rm -f /etc/systemd/system/kubelet.service.d/20-nodenet.conf /etc/systemd/system/crio.service.d/20-nodenet.conf; systemctl daemon-reload"
ExecStartPre=-/bin/podman rm -f calico-early
ExecStartPre=/bin/mkdir -p /etc/calico-early
ExecStartPre=/bin/sh -c "test -f /etc/calico-early/details.yaml || /bin/curl -o /etc/calico-early/details.yaml http://172.31.1.1:8080/calico-early/details.yaml"
ExecStart=/bin/podman run --rm --privileged --net=host --name=calico-early -v /etc/calico-early:/etc/calico-early -e CALICO_EARLY_NETWORKING=/etc/calico-early/details.yaml quay.io/tigera/cnx-node:latest
[Install]
WantedBy=multi-user.target
- You must also install your Tigera-issued pull secret at
/root/.docker/config.json, on each node, to enable pulling from quay.io/. - Some OpenShift versions have a
nodeip-configurationservice that configures kubelet's--node-ipoption wrongly for a dual ToR setup. TheAfter=nodeip-configuration.servicesetting and the deletion of20-nodenet.confundo that service's work so that kubelet can choose its own IP correctly (using a reverse DNS lookup). - The
/bin/curl ...line shows how you can download the EarlyNetworkConfiguration YAML from a central hosting point within your cluster.
Secondly, a "calico-early-wait" service that delays kubelet until after the Calico early networking setup is in place:
[Unit]
After=calico-early.service
Before=kubelet.service
[Service]
Type=oneshot
ExecStart=/bin/sh -c "while sleep 5; do grep -q 00000000:1FF3 /proc/net/tcp && break; done; sleep 15"
[Install]
WantedBy=multi-user.target
- The
ExecStartline here arranges that kubelet will not start running until the calico-early service has started listening on port 8179 (hex1FF3). 8179 is the port that the calico-early service uses for pre-Kubernetes BGP. - We have sometimes observed issues if kubelet starts immediately after Calico's early
networking setup, because of NetworkManager toggling the hostname. The final
sleep 15allows for such changes to settle down before kubelet starts.
On OpenShift you should wrap the above service definitions in MachineConfig resources
for the control and worker nodes.
On other platforms either define and enable the above services directly, or use whatever API the platform provides to define and enable services on new nodes.
Configure your ToR routers and infrastructure
You should configure your ToR routers to accept all the BGP peerings from Calico Cloud nodes, to reflect routes between the nodes in that rack, and to propagate routes between the ToR routers in different racks. In addition we recommend consideration of the following points.
BFD should be enabled if possible on all BGP sessions - both to the Calico Cloud nodes, and between racks in your core infrastructure - so that a break in connectivity anywhere can be rapidly detected. The handling should be to initiate LLGR procedures if possible, or else terminate the BGP session non-gracefully.
LLGR should be enabled if possible on all BGP sessions - again, both to the Calico Cloud nodes, and between racks in your core infrastructure. Traditional BGP graceful restart should not be used, because this will delay the cluster's response to a break in one of the connectivity planes.
Install Kubernetes and Calico Cloud
Details here vary, depending on when your Kubernetes installer gives an opportunity for you to define custom resources, but fundamentally what is needed here is to perform the installation as usual, except that all of the Calico resources prepared above, except the EarlyNetworkConfiguration, must be added into the datastore before the cnx-node pods start running on any node. We can illustrate this by looking at two examples: with OpenShift, and when adding Calico to an existing Kubernetes cluster.
OpenShift
With OpenShift, follow our documentation as far as the option to provide additional configuration.
Then use kubectl create configmap ..., as that documentation says, to combine the
prepared BGPPeer, BGPConfiguration and IPPool resources into a calico-resources
ConfigMap. Place the generated file in the manifests directory for the OpenShift install.
Also place the "bgp-layout" ConfigMap file in the manifests directory.
Now continue with the OpenShift install process, and it will take care of adding those resources into the datastore as early as possible.
Adding to an existing Kubernetes cluster
Follow our documentation
as
far as the option for installing any custom Calico resources. Then use calicoctl, as
that documentation says, to install the prepared BGPPeer, BGPConfiguration and IPPool
resources.
Also use kubectl to install the "bgp-layout" ConfigMap.
Now continue with the Calico Cloud install process, and you should observe each node establishing BGP sessions with its ToRs.
Verify the deployment
If you examine traffic and connections within the cluster - for example, using ss or
tcpdump - you should see that all connections use loopback IP addresses or pod CIDR IPs
as their source and destination. For example:
-
The kubelet on each node connecting to the API server.
-
The API server's connection to its backing etcd database, and peer connections between the etcd cluster members.
-
Pod connections that involve an SNAT or MASQUERADE in the data path, as can be the case when connecting to a Service through a cluster IP or NodePort. At the point of the SNAT or MASQUERADE, a loopback IP address should be used.
-
Direct connections between pod IPs on different nodes.
The only connections using interface-specific addresses should be BGP.
If you plan to use Egress Gateways in your cluster, you must also adjust the cnx-node IP
auto-detection method to pick up the stable IP, for example using the interface: lo setting
(The default first-found setting skips over the lo interface). This can be configured via the
Calico Cloud Installation resource.
If you look at the Linux routing table on any cluster node, you should see ECMP routes like this to the loopback address of every other node in other racks:
172.31.20.4/32
   nexthop via 172.31.11.250 dev eth0
   nexthop via 172.31.12.250 dev eth1
and like this to the loopback address of every other node in the same rack:
172.31.10.4/32
   nexthop dev eth0
   nexthop dev eth1
If you launch some pods in the cluster, you should see ECMP routes for the /26 IP blocks for the nodes where those pods were scheduled, like this:
10.244.192.128/26
   nexthop via 172.31.11.250 dev eth0
   nexthop via 172.31.12.250 dev eth1
If you do something to break the connectivity between racks of one of the planes, you should see, within only a few seconds, that the affected routes change to have a single path only, via the plane that is still unbroken; for example:
172.31.20.4/32 via 172.31.12.250 dev eth1`
10.244.192.128/26 via 172.31.12.250 dev eth1
When the connectivity break is repaired, those routes should change to become ECMP again.