Get started with network sets
Visualize traffic to/from your cluster
Modern applications often integrate with third-party APIs and SaaS services that live outside Kubernetes clusters. To securely enable access to those integrations, you must be able to limit IP ranges for egress and ingress traffic to workloads. Limiting IP lists or ranges is also used to deny-list bad actors or embargoed countries. To limit IP ranges, you need to use the Calico Enterprise resource called network sets.
What are network sets?
Network sets are a grouping mechanism that allows you to create an arbitrary set of IP subnetworks/CIDRs or domains that can be matched by standard label selectors in Kubernetes or Calico Enterprise network policy. Like IP pools for pods, they allow you to reuse/scale sets of IP addresses in policies.
A network set is a namespaced resource that you can use with Kubernetes or Calico Enterprise network policies; a global network set is a cluster-wide resource that you can use with Calico Enterprise network policies.
Like network policy, you manage user access to network sets using standard Kubernetes RBAC.
Why are network sets powerful?
If you are familiar with Service Graph in the web console, you know the value of seeing pod-to-pod traffic within your cluster. But what about traffic external to your cluster?
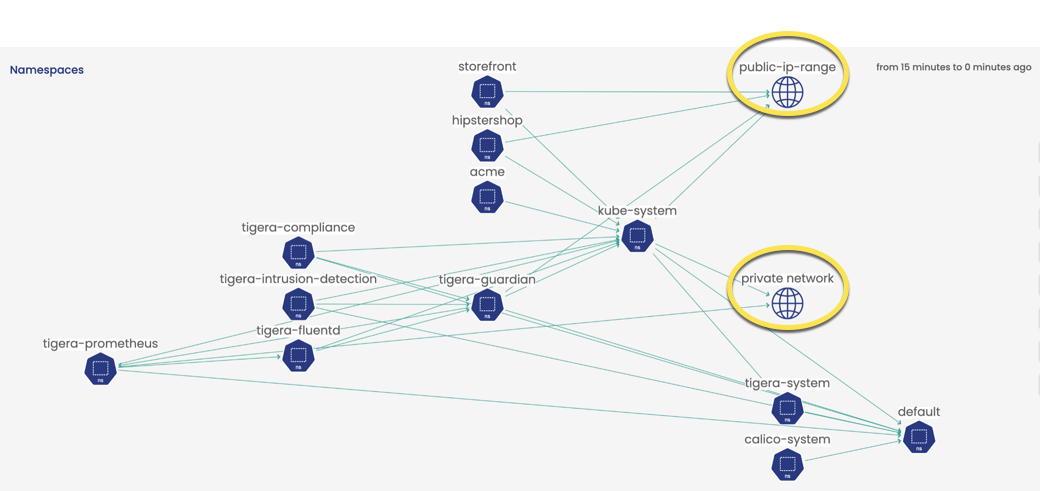
Calico Enterprise automatically detects IPs for pods and nodes that fall into the standard IETF “public network” and “private network” designations, and displays those as icons in Service Graph. So you get some visibility into external traffic without using any network sets.
However, when you create network sets, you can get more granular visibility into what's leaving the cluster to public networks. Because you control the grouping, the naming, and labeling, you create visibility that is customized to your organization. This is why they are so powerful.
Here are just a few examples of how network sets can be used:
-
Egress access control
Network sets are a key resource for defining egress access controls; for example, securing ingress to microservices/apps or egress from workloads outside the cluster.
-
Troubleshooting
Network sets appear as additional metadata in flow logs and Kibana, Flow Visualizer, and Service Graph.
-
Efficiency and scaling
Network sets are critical when scaling your deployment. You may have only a few CIDRs when you start. But as you scale out, it is easier to update a handful of network sets than update each network policy individually. Also, in a Kubernetes deployment, putting lots of anything (CIDRs, ports, policy rules) directly into policies causes inefficiencies in traffic processing (iptables/eBPF).
-
Microsegmentation and shift left
Network sets provide the same microsegmentation controls as network policy. For example, you can allow specific users to create policies (that reference network sets), but allow only certain users to manage network sets.
-
Threat defense
Network sets are key to being able to manage threats by blocking bad IPs with policy in a timely way. Imagine having to update individual policies when you find a bad IP you need to quickly block. You can even give access to a controller that automatically updates CIDRs in a network set when a bad IP is found.
Create a network set and use it in policy
In this section, we’ll walk through how to create a namespaced network set in the web console. You can follow along using your cluster or tigera-labs cluster.
In this example, you will create a network set named, google. This network set contains a list of trusted google endpoints for a microservice called, hipstershop. As a service owner, you want to be able to see traffic leaving the microservices in Service Graph. Instead of matching endpoints on IP addresses, we will use domain names.
- From the left navbar, click Network Sets.
- Click Add Network Set, and enter these values.
- For Name:
google - For Scope: Select Namespace and select,
hipstershop
- For Name:
- Under Labels, click Add label.
- In the Select key field, enter
destinationsand click the green bar to add this new entry. - In the Value field, enter
google, click the green bar to add the entry, and save.
- In the Select key field, enter
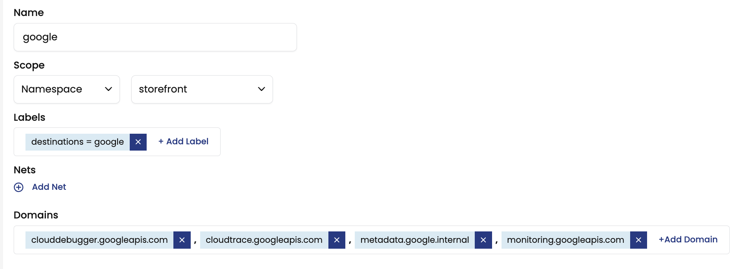
- For Domains, click +Add Domain and these URLs:
clouddebugger.googleapis.com,cloudtrace.googleapis.com,metadata.google.internal,monitoring.googleapis.com. - Click Create Network Set.
You’ve created your first network set.
The YAML looks like this:
kind: NetworkSet
apiVersion: projectcalico.org/v3
metadata:
  name: google
  labels:
    destinations: google
  namespace: hipstershop
spec:
  nets: []
  allowedEgressDomains:
    - clouddebugger.googleapis.com
    - cloudtrace.googleapis.com
    - metadata.google.internal
    - monitoring.googleapis.com
Next, we write a DNS policy for hipstershop that allows egress traffic to the trusted google sites. The following network policy allows egress access for all destination selectors labeled, google. Note that putting domains in a network set referencing it in policy is the best practice. Also, note that using selector: all() should only be used if all pods in the namespace can access all of the domains in the network set; if not, you should create separate policies accordingly.
apiVersion: projectcalico.org/v3
kind: NetworkPolicy
metadata:
  name: application.allow-egress-domain
  namespace: hipstershop
spec:
  tier: application
  order: 0
  selector: all()
  serviceAccountSelector: ''
  egress:
    - action: Allow
      source: {}
      destination:
        selector: destinations == "google"
  types:
    - Egress
Network sets in Service Graph
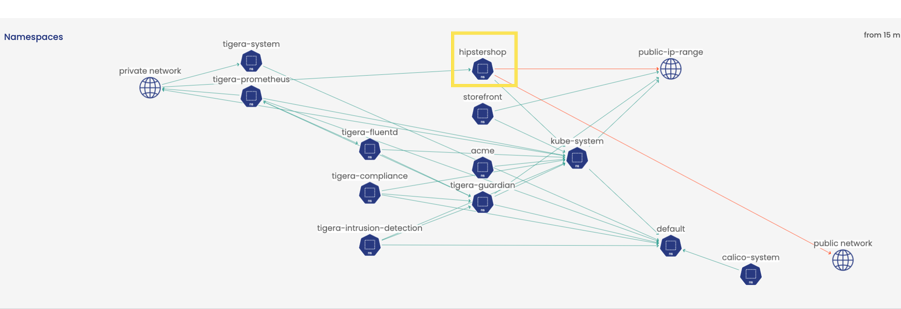
Continuing with our hipstershop example, if you go to Service Graph, you see hipstershop (highlighted in yellow).
If we double-click hipstershop to drill down, we now see the google network set icon (highlighted in yellow). We now have visibility to traffic external from google sites to hipstershop. (If you are using the tigera-labs cluster, note that the network set will not be displayed as shown below.)
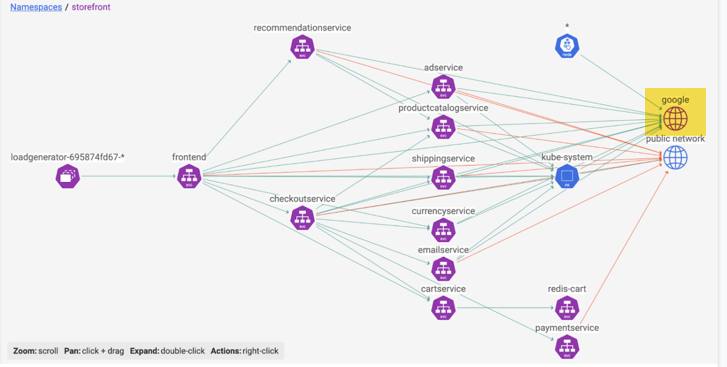
Service Graph provides a view into how services are interconnected in a consumable view, along with easy access to flow logs. However, you can also see traffic associated with network sets in volumetric display with Flow Visualizer, and query flow log data associated with network sets in Kibana.
Tutorial
In the following example, we create a global network set resource for a trusted load-balancer that can be used with microservices and applications. The label, trusted-ep: load-balancer is how this global network set can be referenced in policy.
apiVersion: projectcalico.org/v3
kind: GlobalNetworkSet
metadata:
  name: load-balancer
  labels:
    trusted-ep: "load-balancer"
spec:
  nets:
 # Modify the ip addresses to refer to the ip addresses of load-balancers in your environment
    - 10.0.0.1/32
    - 10.0.0.2/32
The following network policy uses the selector: trusted-ep == "load balancer" to reference the above GlobalNetworkSet. All applications in the app2-ns namespace, that match app2 and svc1 are allowed ingress traffic from the trusted load balance on port 1001.
apiVersion: projectcalico.org/v3
kind: NetworkPolicy
metadata:
  name: application.app2-svc1
  namespace: app2-ns
spec:
  tier: application
  order: 500
  selector: (app == "app2"&&svc == "svc1")
  ingress:
    - action: Allow
      protocol: TCP
      source:
        selector: trusted-ep == "load-balancer"
      destination:
        ports:
          - '10001'
  types:
    - Ingress
Advanced policy rules with network sets
When you combine Calico Enterprise policy rules with network sets, you have powerful ways to fine-tune. The following example combines network sets with specific rules in a global network policy to deny access more quickly. We start by creating a Calico Enterprise GlobalNetworkSet that specifies a list of CIDR ranges we want to deny: 192.0.2.55/32 and 203.0.113.0/24.
apiVersion: projectcalico.org/v3
kind: GlobalNetworkSet
metadata:
  name: ip-protect
  labels:
    ip-deny-list: 'true'
spec:
  nets:
    - 192.0.2.55/32
    - 203.0.113.0/24
Next, we create two Calico Enterprise GlobalNetworkPolicy resources. The first is a high "order" policy that allows traffic as a default for things that don’t match our second policy, which is low "order" and uses the GlobalNetworkSet label as a selector to deny ingress traffic (IP-deny-list in the previous step). In the label selector, we also include the term, !has(projectcalico.org/namespace), which prevents this policy from matching pods or NetworkSets that also have this label. To more quickly enforce the denial of forwarded traffic to the host at the packet level, use the doNotTrack and applyOnForward options.
apiVersion: projectcalico.org/v3
kind: GlobalNetworkPolicy
metadata:
  name: forward-default-allow
spec:
  selector: apply-ip-protect == 'true'
  order: 1000
  doNotTrack: true
  applyOnForward: true
  types:
    - Ingress
  ingress:
    - action: Allow
---
apiVersion: projectcalico.org/v3
kind: GlobalNetworkPolicy
metadata:
  name: ip-protect
spec:
  selector: apply-ip-protect == 'true'
  order: 0
  doNotTrack: true
  applyOnForward: true
  types:
    - Ingress
  ingress:
    - action: Deny
      source:
        selector: ip-deny-list == 'true' && !has(projectcalico.org/namespace)
Best practices for using network sets
-
Create network sets as soon as possible after getting started
This allows you to quickly realize the benefits of seeing custom metadata in flow logs and visualizing traffic in Service Graph and Flow Visualizer.
-
Create a network set label and name schema
It is helpful to think: what names would be meaningful and easy to understand when you look in Service Graph? Flow Viz? Kibana? What labels will be easy to understand when used in network policies – especially if you are separating users who manage network sets from those who consume them in network policies.
-
Do not put large sets of CIDRs and domains directly in policy
Network sets allow you to specify CIDRs and/or domains. Although you can add CIDRs and domains directly in policy, it doesn't scale.
-
Do not put thousands of rules into a policy, each with a different CIDR
If your set of /32s can be easily aggregated into a few broader CIDRs without compromising security, it’s a good thing to do; whether you’re putting the CIDRs in the rule or using a network set.
-
If you want to match thousands of endpoints, write one or two rules and use selectors to match the endpoints.
Having one rule per port, per host is inefficient because each rule ends up being rendered as an iptables/eBPF rule instead of making good use of IP sets.
-
Avoid overlapping IP addresses/subnets in networkset/globalnetworkset definitions
Efficient use of network sets
If you have a large number of things to match, using a network set is more efficient both in the control plane (for example, Felix CPU), and for the packet path (latency/per packet CPU). If you use network sets and you add/remove an IP from the network set, this doesn't require changing iptables rules at all. It only requires updating the ipset, which is efficient. If you also change the policy rules, then iptables must be updated too. Using network sets is efficient for all of the following use cases:
- The system applying the iptables rules to incoming connections (to decide whether to allow or deny the traffic)
- iptables rules updates whenever one of the policies and/or network sets change
- The Kubernetes APIserver handling changes to the policy and/or networkset CRDs
Follow these guidelines for efficient use of network sets.
| Policy | Network set | Results |
|---|---|---|
| source: selector: foo="bar" | With handful of broad CIDRs | Efficient - 1 iptables/eBPF rule - 1 IP set with handful of CIDRs |
| source: nets: [ ... handful ...] | Not used | Efficient - Handful of iptables/eBPF rules - 0 IP sets |
| source: selector: foo="bar" | One network set with 2000 x /32s | *Most efficient - 1 iptables/eBPF rule - 1 IP sets with 2000 entries |
| Two network sets with 1000 each x /32s | Efficient - 2 iptables/eBPF rules - 2 IP set with 1000 entries | |
| source: nets: [... 2000 /32s ...] - source: nets: [1 x /32] - source: nets: [1 x /32] - ... x 2000 | Not used | Inefficient Results in programming 2k iptables/eBPF rules - 2000+ iptables/eBPF rules - 0 IP sets |
* Updating ipsets is fast and efficient. Adding/removing a single entry is an O(1) operation no matter the number of IPs in the set. Updating iptables is generally slow and gets slower the more rules you have in total (including rules created by kube-proxy, for example). Less than 10K rules are generally fine, but noticeable latency occurs when updating rules above that number (increasing as the number of rules grows). (The newer nftables may scale more efficiently but those results are not included here.)
Similarly, hitting many iptables (or eBPF) rules adds latency to the first packet in a flow. For iptables, it measures around 250ns per rule. Although a single rule is negligible, hitting 10K rules add >1ms to the first packet in the flow. Packets only hit the rules for the particular interface that they arrive on; if you have 10K rules on one interface and 10 rules on another, the packet processed by the first interface will have more latency.