Calico quickstart guide
This quickstart guide shows you how to install Calico, secure a cluster with network policy, and monitor network traffic with Calico Whisker.
Before you begin
You'll need to install a few tools to complete this tutorial:
kind. This is what you'll use to create a cluster on your workstation. For installation instructions, see thekinddocumentation.- Docker Engine or Docker Desktop.
This is required to run containers for the
kindutility. For installation instructions, see the Docker documentation. kubectl. This is the tool you'll use to interact with your cluster. For installation instructions, see the Kubernetes documentation
Step 1: Create a cluster
In this step, you will:
- Create a cluster: Use
kindto create a Kubernetes cluster. - Verify the cluster: Check that the cluster is running and ready.
-
Create a file called
config.yamland give it the following content:kind: ClusterapiVersion: kind.x-k8s.io/v1alpha4nodes:- role: control-plane- role: worker- role: workernetworking:disableDefaultCNI: truepodSubnet: 192.168.0.0/16This configuration file tells
kindto create a cluster with one control-plane node and two worker nodes. It instructskindto create the cluster without a CNI. ThepodSubnetrange defines the IP addresses that Kubernetes will use for pods. -
Start your Kubernetes cluster with the configuration file by running the following command:
kind create cluster --name=calico-cluster --config=config.yamlkindreads your configuration file and creates a cluster in a few minutes.Expected outputCreating cluster "calico-cluster" ...✓ Ensuring node image (kindest/node:v1.29.2) 🖼✓ Preparing nodes 📦 📦 📦✓ Writing configuration 📜✓ Starting control-plane 🕹️✓ Installing StorageClass 💾✓ Joining worker nodes 🚜Set kubectl context to "kind-calico-cluster"You can now use your cluster with:kubectl cluster-info --context kind-calico-clusterThanks for using kind! 😊 -
To verify that your cluster is working, run the following command:
kubectl get nodesYou should see three nodes with the name you gave the cluster.
Expected outputNAME STATUS ROLES AGE VERSIONcalico-cluster-control-plane NotReady control-plane 5m46s v1.29.2calico-cluster-worker NotReady <none> 5m23s v1.29.2calico-cluster-worker2 NotReady <none> 5m22s v1.29.2Don't wait for the nodes to get a
Readystatus. They remain in aNotReadystatus until you configure networking in the next step.
Step 2. Install Calico
In this step, you will install Calico in your cluster.
-
Install the Calico custom resource definitions.
kubectl create -f https://raw.githubusercontent.com/projectcalico/calico/v3.32.1/manifests/v1_crd_projectcalico_org.yaml -
Install the Tigera Operator.
kubectl create -f https://raw.githubusercontent.com/projectcalico/calico/v3.32.1/manifests/tigera-operator.yamlExpected outputnamespace/tigera-operator createdserviceaccount/tigera-operator createdclusterrole.rbac.authorization.k8s.io/tigera-operator-secrets createdclusterrole.rbac.authorization.k8s.io/tigera-operator createdclusterrolebinding.rbac.authorization.k8s.io/tigera-operator createdrolebinding.rbac.authorization.k8s.io/tigera-operator-secrets createddeployment.apps/tigera-operator created -
Install Calico by creating the necessary custom resources.
kubectl create -f https://raw.githubusercontent.com/projectcalico/calico/v3.32.1/manifests/custom-resources.yamlExpected outputinstallation.operator.tigera.io/default createdapiserver.operator.tigera.io/default createdgoldmane.operator.tigera.io/default createdwhisker.operator.tigera.io/default created -
Monitor the deployment by running the following command:
watch kubectl get tigerastatusAfter a few minutes, all the Calico components display
Truein theAVAILABLEcolumn.Expected outputNAME AVAILABLE PROGRESSING DEGRADED SINCEapiserver True False False 4m9scalico True False False 3m29sgoldmane True False False 3m39sippools True False False 6m4swhisker True False False 3m19s
Step 3. Monitor network traffic in Calico Whisker
The Whisker web console deploys automatically, but it is not accessible from outside the cluster by default. To view the web console, you need to allow access.
In this step, you will:
- Set up port forwarding: This allows you to access the Whisker web console from your browser.
- Open the Whisker web console: View the network traffic logs in real time.
-
From your terminal, run the following command:
kubectl port-forward -n calico-system service/whisker 8081:8081Expected outputForwarding from 127.0.0.1:8081 -> 8081Forwarding from [::1]:8081 -> 8081Keep this terminal open throughout the rest of this tutorial. The Whisker web console needs the port forwarding to be active to receive logs.
-
To open Calico Whisker, open your browser and go to
localhost:8081. You won't see any flows at the beginning. But in a few moments, as the console receives flow logs, you'll begin to see a list of connections.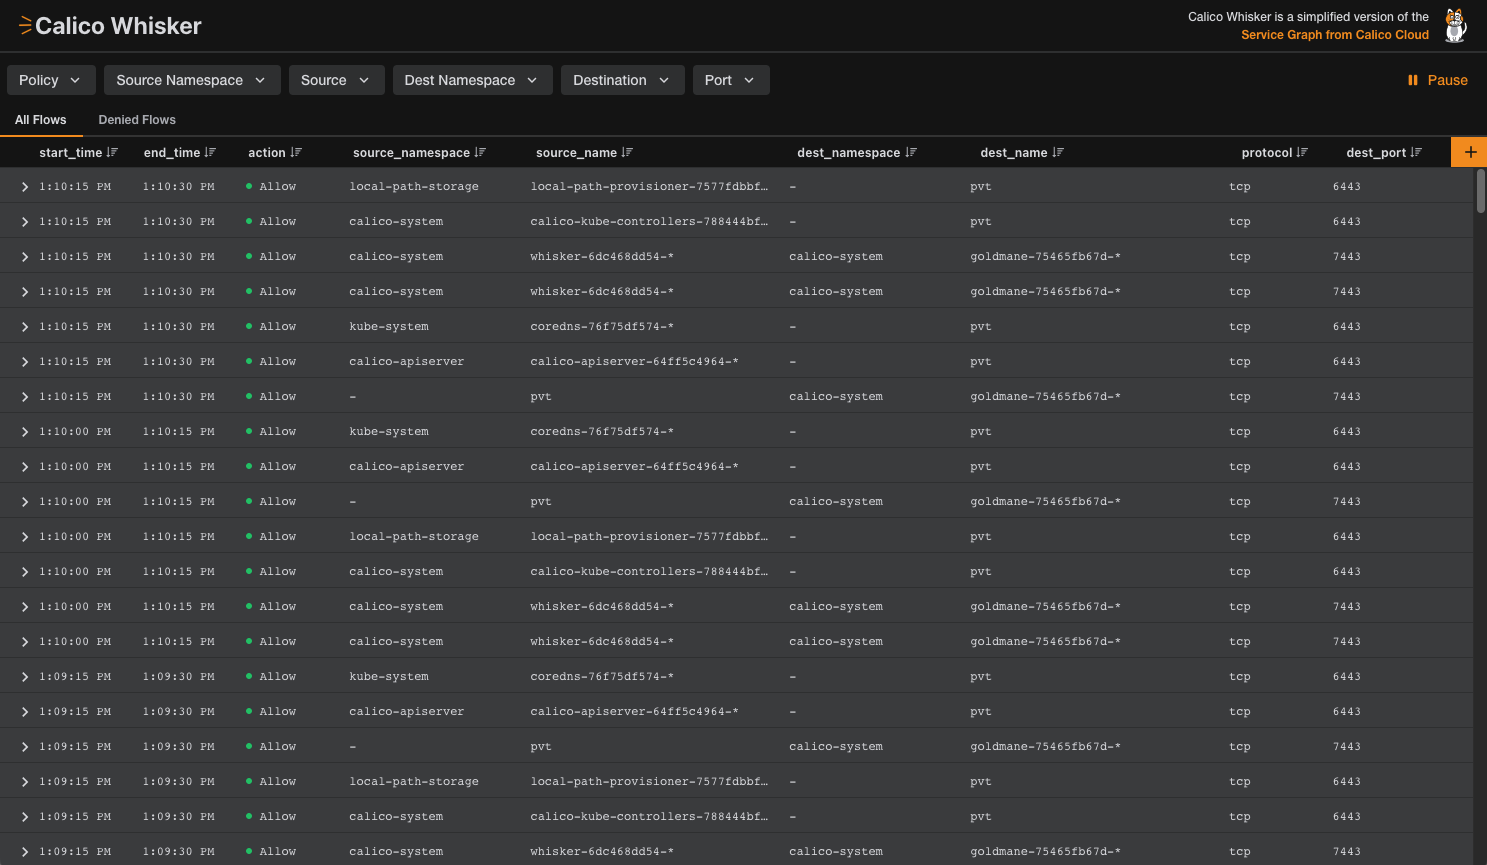
Figure 1: Whisker web console with allowed flows for core Kubernetes services.
The web console accumulates flow logs in real time. Keep this window open through the rest of the tutorial to see logs of the connections your pods are making.
Step 4. Deploy NGINX and BusyBox to generate traffic
Now it's time to generate some network traffic. We'll do this first by deploying an NGINX server and exposing it as a service in the cluster. Then we'll make HTTP requests from another pod in the cluster to the NGINX server and to an external website. For this we'll use the BusyBox utility.
In this step, you will:
- Create a server: Deploy an NGINX web server in your Kubernetes cluster.
- Expose the server: Make the NGINX server accessible within the cluster.
- Test connectivity: Use a BusyBox pod to verify connections to the NGINX server and the public internet.
-
Create a namespace for your application:
kubectl create namespace quickstartExpected outputnamespace/quickstart created -
Deploy an NGINX web server in the
quickstartnamespace:kubectl create deployment --namespace=quickstart nginx --image=nginxExpected outputdeployment.apps/nginx created -
Expose the NGINX deployment to make it accessible within the cluster:
kubectl expose --namespace=quickstart deployment nginx --port=80Expected outputservice/nginx exposed -
Start a BusyBox session to test whether you can access the NGINX server.
kubectl run --namespace=quickstart access --rm -ti --image busybox /bin/shThis command creates a BusyBox pod inside the
quickstartnamespace and starts a shell session inside the pod.Expected outputIf you don't see a command prompt, try pressing enter./ # -
In the BusyBox shell, run the following command to test communication with the NGINX server:
wget -qO- http://nginxYou should see the HTML content of the NGINX welcome page.
Expected output<!DOCTYPE html><html><head><title>Welcome to nginx!</title><style>html { color-scheme: light dark; }body { width: 35em; margin: 0 auto;font-family: Tahoma, Verdana, Arial, sans-serif; }</style></head><body><h1>Welcome to nginx!</h1><p>If you see this page, the nginx web server is successfully installed andworking. Further configuration is required.</p><p>For online documentation and support please refer to<a href="http://nginx.org/">nginx.org</a>.<br/>Commercial support is available at<a href="http://nginx.com/">nginx.com</a>.</p><p><em>Thank you for using nginx.</em></p></body></html>This confirms that the BusyBox pod can access the NGINX server.
-
In the Busybox shell, run the following command test communication with the public internet:
wget -qO- https://docs.tigera.io/pod-connection-test.txtYou should see the content of the file
pod-connectivity-test.txt.Expected outputYou successfully connected to https://docs.tigera.io/pod-connection-test.txt.This confirms that the BusyBox pod can access the public internet.
-
Return to your browser to see the connection appear in the Whisker web console. You should see three new connection types: one to
corednsone tonginx, and another toPUBLIC NETWORK.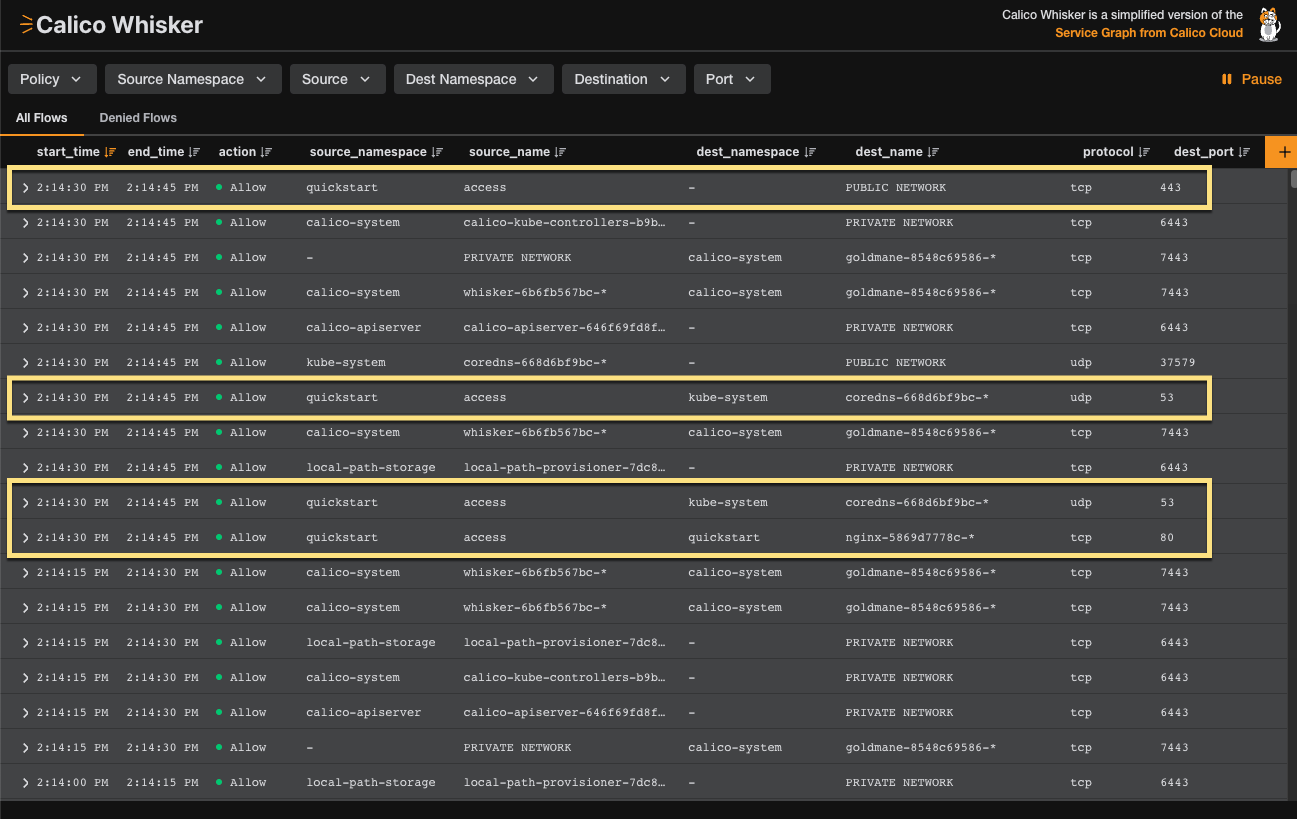
Figure 2: Whisker web console showing allowed flows to NGINX server and
https://docs.tigera.io.
Step 5. Restrict all traffic with a default deny policy
To effectively secure your cluster, it's best to start by denying all traffic, and then gradually allowing only the necessary traffic. We'll do this by applying a Global Calico Network Policy that denies all ingress and egress traffic by default.
In this step, you will:
- Implement a global default deny policy: Use a Global Calico Network Policy to deny all ingress and egress traffic by default.
- Verify access is denied: Use your BusyBox pod to confirm that the policy is working as expected.
-
Create a Global Calico Network Policy to deny all traffic except for the necessary system namespaces:
kubectl create -f - <<EOFapiVersion: projectcalico.org/v3kind: GlobalNetworkPolicymetadata:name: default-denyspec:selector: projectcalico.org/namespace not in {'kube-system', 'calico-system', 'calico-apiserver'}types:- Ingress- EgressEOFExpected outputglobalnetworkpolicy.projectcalico.org/default-deny created -
Now go back to your BusyBox shell and test access to the NGINX server again:
wget -qO- http://nginxYou should see the following output, indicating that access is denied:
Expected outputwget: bad address 'nginx' -
Test access to the public internet again:
wget -qO- https://docs.tigera.io/pod-connection-test.txtYou should see the following output, indicating that egress traffic is also denied:
Expected outputwget: bad address 'docs.tigera.io' -
Return to your browser to see the denied flow logs appear in the Whisker web console. You should see two denied flows to
coredns.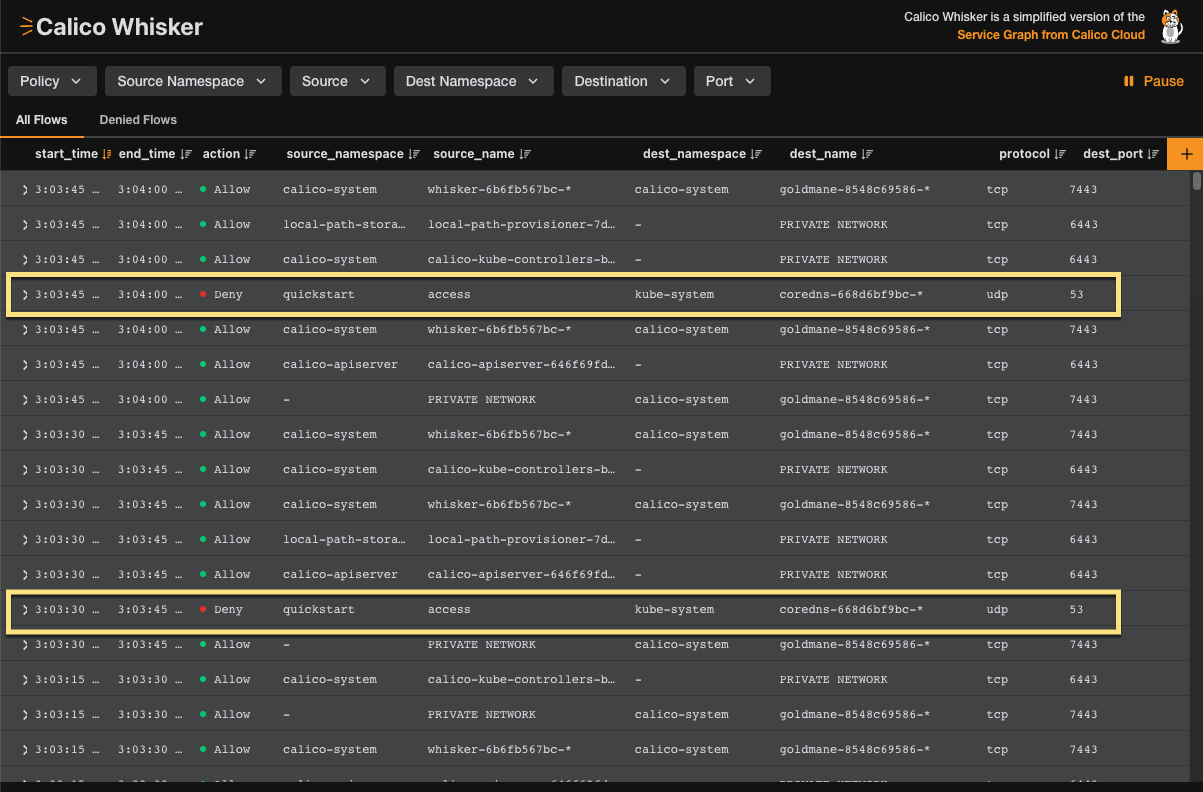
Figure 3: Whisker web console showing denied flows to NGINX server and
https://docs.tigera.io.By following these steps, you have successfully implemented a global default deny policy and verified that it is working as expected.
Step 6. Create targeted network policy for allowed traffic
Now that you have a default deny policy in place, you need to create specific policies to allow only the necessary traffic for your applications to function.
The default-deny policy blocks all ingress and egress traffic for pods not in system namespaces, including our access (BusyBox) and nginx pods in the quickstart namespace.
In this step, you will:
- Allow egress traffic from BusyBox Create a network policy to allow egress traffic from the BusyBox pod to the public internet.
- Allow ingress traffic to NGINX Create a network policy to allow ingress traffic to the NGINX server.
-
Create a Calico network policy in the
quickstartnamespace that selects theaccesspod and allows all egress traffic from it.kubectl create -f - <<EOFapiVersion: projectcalico.org/v3kind: NetworkPolicymetadata:name: allow-busybox-egressnamespace: quickstartspec:selector: run == 'access'types:- Egressegress:- action: AllowEOFExpected outputnetworkpolicy.projectcalico.org/allow-busybox-egress created -
Back in the BusyBox shell, test access to the public internet again. Because egress traffic is now allowed from this pod, this should succeed:
wget -qO- https://docs.tigera.io/pod-connection-test.txtExpected outputYou successfully connected to https://docs.tigera.io/pod-connection-test.txt. -
Test access to the NGINX server again. Egress from the
accesspod is allowed by the new policy, but ingress to thenginxpod is still blocked by thedefault-denypolicy. This request should fail.wget -qO- http://nginxExpected outputwget: bad address 'nginx'
-
Create another Calico network policy in the
quickstartnamespace. This policy selects thenginxpods (using the labelapp=nginx) and allows ingress traffic specifically from pods with the labelrun=access.kubectl create -f - <<EOFapiVersion: projectcalico.org/v3kind: NetworkPolicymetadata:name: allow-nginx-ingressnamespace: quickstartspec:selector: app == 'nginx'types:- Ingressingress:- action: Allowsource:selector: run == 'access'EOFExpected outputnetworkpolicy.org/allow-nginx-ingress created -
Test access to the NGINX server again. From the BusyBox shell, test access to the NGINX server one more time:
wget -qO- http://nginxNow that both egress from
accessand ingress tonginx(fromaccess) are allowed, the connection should succeed. You'll see the NGINX welcome page:Expected output<!DOCTYPE html><html><head><title>Welcome to nginx!</title><style>html { color-scheme: light dark; }body { width: 35em; margin: 0 auto;font-family: Tahoma, Verdana, Arial, sans-serif; }</style></head><body><h1>Welcome to nginx!</h1><p>If you see this page, the nginx web server is successfully installed andworking. Further configuration is required.</p><p>For online documentation and support please refer to<a href="http://nginx.org/">nginx.org</a>.<br/>Commercial support is available at<a href="http://nginx.com/">nginx.com</a>.</p><p><em>Thank you for using nginx.</em></p></body></html>
You have now successfully implemented a default deny policy and then created targeted allow policies to restore connectivity only for your applications.
Step 7. Clean up
-
To remove the
kindcluster, run the following command:kind delete cluster --name calico-clusterExpected outputDeleting cluster "calico-cluster" ...Deleted nodes: ["calico-cluster-control-plane" "calico-cluster-worker2" "calico-cluster-worker"]
Additional resources
- Want to dive deeper? Explore this free, interactive workshop to learn Calico basics, Kubernetes observability with Whisker, and more—right in your browser.