Egress access controls
This document will outline what egress access controls are, what they can protect you from, and how you can implement Kubernetes egress access controls with Calico to protect, restrict, and manage egress access.
You can get started with Calico by following our quickstart guide. You'll learn how to install Calico, secure a cluster with network policy, and monitor network traffic with Calico Whisker.
Overview
What are egress access controls?
Kubernetes egress access controls manage egress traffic from a Kubernetes cluster. Egress describes traffic that leaves a network entity to communicate with another network entity. In Kubernetes, this could be a pod communicating with another pod within the same cluster, or communicating with another application or service outside the cluster entirely. Common egress communications are to other applications, APIs, services, or databases.
In Kubernetes, the default behavior is to allow all ingress and egress traffic. Controlling egress traffic in Kubernetes can be done with Calico or Kubernetes outbound network policies. This could be considered akin to a Kubernetes firewall, as you can define none, one, or multiple ingress or egress rules, which will then apply to a specified entity using labels and selectors. This allows you to secure Kubernetes egress traffic to known and trusted endpoints over specific ports and protocols.
If you’re new to network policies we recommend that you read this: What is network policy?
What can egress access controls protect you from?
Egress access controls protect you and your network from multiple attack vectors. Most relevant are those that involve initiating malicious communications from within a pod with intent to control, download, or run malware, or to steal data.
Kubernetes outbound traffic control allows you to restrict and protect your environment. This mitigates the possible effects of leaving the default Kubernetes behavior, which allows unrestricted network access to and within your cluster. Egress access controls protect and restrict traffic leaving a cluster, also known as north-south traffic. Traffic within a cluster, known as east-west traffic, is also protected by implementing egress rules where the communication is not leaving the cluster, such as going to another pod or microservice.
Calico's egress controls secure clusters against many common attack vectors:
- command and control attacks (C2)
- lateral movement and privilege escalation
- malware installation
- data exfiltration
All of these attack vectors require a threat actor to initiate communication from a compromised pod. This actor tries to reach an outside entity for remote control to download malware, transfer sensitive information, or to explore the system for more vulnerabilities to exploit.
We have a blog post with more details on how Calico can protect against attacks across the cyber kill chain.
Securing Kubernetes egress makes the above vectors less likely to succeed:
- It reduces the number of accessible egress traffic channels where threat actors can hide or disguise malicious traffic.
- It blocks communication to known malicious endpoints or control centers.
- It limits the possibility of lateral movement with workload isolation to minimize privilege escalation techniques or reconnaissance activities.
- It restricts access to unknown endpoints and can prevent data exfiltration.
Egress access controls shouldn’t be used in isolation as a security defense mechanism. But when combined with microsegmentation practices, egress gateways (for integration with external firewalls) and runtime security, it can greatly enhance your security posture by offering prevention and increasing the likelihood of earlier detection.
In one of our blog posts, we demonstrate how implementing egress access controls in Kubernetes is enough to thwart an exploit of the log4shell vulnerability.
Egress access controls with Kubernetes and Calico Open Source
Network policies are the tool in Kubernetes to control traffic flow between different entities and can be used for egress isolation. With the native network policy in Kubernetes, you can define egress rules that limit communication between pods and other entities. You can define a destination with label selectors or IP addresses, and you can specify ports and protocols. If a pod or namespace does not have a network policy applied to it, default behavior will allow all egress communication.
Kubernetes network policies can control egress access, but it does come with limitations that make this more time-consuming and complicated. Using Kubernetes egress access management without third-party software has its limitations:
- You can't get visibility into existing egress traffic, which aids policy creation and monitoring.
- Because domain names are not supported, you are restricted to allowing or denying egress traffic based on IP blocks. This may be an issue if you're working with services that use dynamic IP addresses or when you don't know the IP block used.
- You must create policies in every namespace, which may result in repetition and a larger number of policies to manage.
Calico Open Source extends Kubernetes network policies, providing additional functionality:
- Network policy ordering lets you create egress allow policies before you enforce a default deny policy, and you can be confident that traffic will be evaluated in the correct order.
- There are explicit action rules, such as Deny, Allow, Pass, Log. These action rules are helpful for passing traffic to other policy tiers in Calico Enterprise or Calico Cloud.
- The log action is useful for Calico Open Source users looking for information about network traffic that matches a rule in a policy.
- Policies applicable to multiple endpoints, such as pods, VMs, and host interfaces, which allows you to control egress access from non-namespaced resources for additional security.
- Global policies let you create network policies that apply to the whole cluster, so you can restrict egress access cluster-wide.
For example, using Kubernetes egress rules with Calico Open Source can be enough to protect against a log4j attack, which you can read about in this blog.
Egress access controls in Calico Enterprise and Calico Cloud
Calico Enterprise and Calico Cloud build upon the features of Calico Open Source network policies.
- Domain names within policy rules allow you to create DNS policy that references domain names This is particularly helpful when targeting public services or APIs where the IP addresses are dynamic and ever-changing. For example, if you were to monitor a pod's communication to the Google API server, you would see it frequently connecting to different IP addresses. It would be an endless process trying to capture and allow all of Google’s IP addresses.
- You can group IP addresses and domain names into network sets for a centralized way of managing them and referring to network sets from network policies.
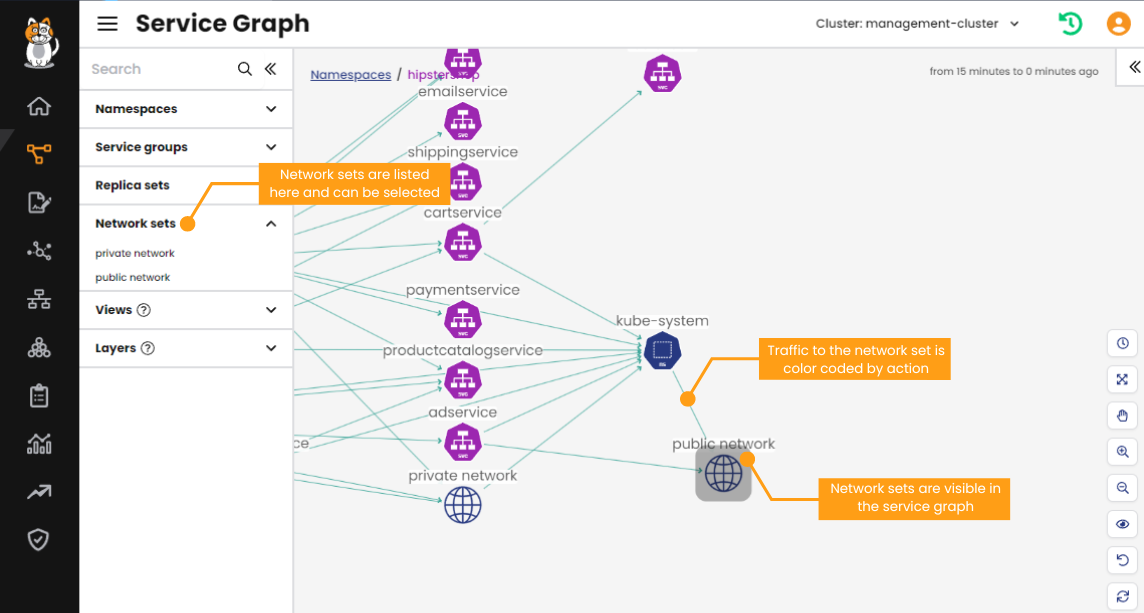
Additionally, network sets are visible in observability tools such as the dynamic service and threat graph and associated flow logs, making it easy to identify and differentiate egress traffic based on the destination.
- Threat intelligence feeds are a common use case of network sets, which are a data stream containing up-to-date details of current cybersecurity risks or threats. You can configure your own threat feeds, create network policies to block egress access to malicious IP addresses or domain names, and set up alerts or security events if any workloads within the cluster attempt to communicate with an endpoint on the threat feed.
- Network policy management using Calico’s policies board helps you visualize policies that are applied to a cluster, group policies into hierarchical tiers, and control the order of evaluation and see the volume of egress traffic that is being allowed or denied. Additionally, staged policies allow you to preview the impact of a policy and evaluate the impact before enforcing it, reducing downtime because of enforcing policies prematurely and inadvertently blocking egress access to critical services.
Implementing egress controls
Set up controls for your egress access with a methodical approach to ensure that you’re mitigating the default Kubernetes allow-all behavior while still allowing egress access to trusted endpoints.
- Isolate pods for egress by implementing Kubernetes security best practices with a global default-deny policy that blocks egress access.
- Identify egress access controls by determining what egress access your workloads, namespaces, or hosts require, and whether you will use domain names or IP addresses. Label assets for egress access so that network policies will apply to the correct endpoints.
- Author policy and network sets to allow egress access to the previously identified destinations.
- Simulate and validate to ensure that egress access control is set up correctly and only allowed destinations are accessible. Once you’ve verified the behavior of your policies you can enforce any staged (Calico Enterprise or Calico Cloud) or logged (Calico Open Source) default deny policies.
Isolate pods for egress
Implementing a global default deny using Calico global network policy ensures that all resources are isolated. It protects you from inadvertently leaving a cluster, namespace, or pod vulnerable to unrestricted access. This is considered part of Kubernetes security best practices.
At this stage, you should evaluate the effectiveness of your planned egress policies. For Calico Enterprise and Calico Cloud users, the best way to do this is to write staged network policies, which lets you preview how traffic would be affected by a policy. Calico Open Source users can do something similar by using the log action rule on network policies. This allows you to evaluate the effectiveness of your egress policies without altering the traffic prematurely. You can find out more in our documentation about staged policies or the log action.
You need to ensure the default deny does not target system pods that are critical to cluster integrity. The following policy correctly excludes system pods from the global deny rule:
apiVersion: projectcalico.org/v3
kind: GlobalNetworkPolicy
metadata:
  name: deny-app-policy
spec:
  namespaceSelector: has(projectcalico.org/name) && projectcalico.org/name not in {"kube-system", "calico-system", "tigera-system"}
  types:
  - Ingress
  - Egress
  egress:
   # allow all namespaces to communicate to DNS pods
  - action: Allow
    protocol: UDP
    destination:
      selector: 'k8s-app == "kube-dns"'
      ports:
      - 53
  - action: Allow
    protocol: TCP
    destination:
      selector: 'k8s-app == "kube-dns"'
      ports:
      - 53
  - action: Deny
    source: {}
    destination: {}

  ingress:
  - action: Deny
    source: {}
    destination: {}
Identify egress access controls
Before writing any policies or creating any network sets, it's a best practice to spend time identifying what external access your workloads require. This will make the Kubernetes egress configuration easier as you write your Kubernetes egress policies with Calico.
Some things worth considering:
- Do you have multiple pods or namespaces that need access to the same external resources?
- If yes, would it be easier to manage a list of domain names and IP blocks in a central resource?
- Are you connecting to a generalized destination that consists of multiple domain names or IP addresses?
- Do you know exactly which port and protocol your egress communications are using?
If you don’t have an exhaustive list of the required egress access you can use Calico to help you.
If you're using Calico Open Source, your investigation work consists primarily in reviewing data from the network policy log action.
If you're Calico Enterprise and Calico Cloud, you can use observability tools and log querying to help identify your egress traffic. The dynamic service and threat graph that allows you to view cluster communication and the protocol and ports used.
Before you create any network sets, communication to public and private networks will be shown as network sets in the service graph.
In the screenshot below you can quickly identify that the adservice workload is communicating with something public outside the cluster.
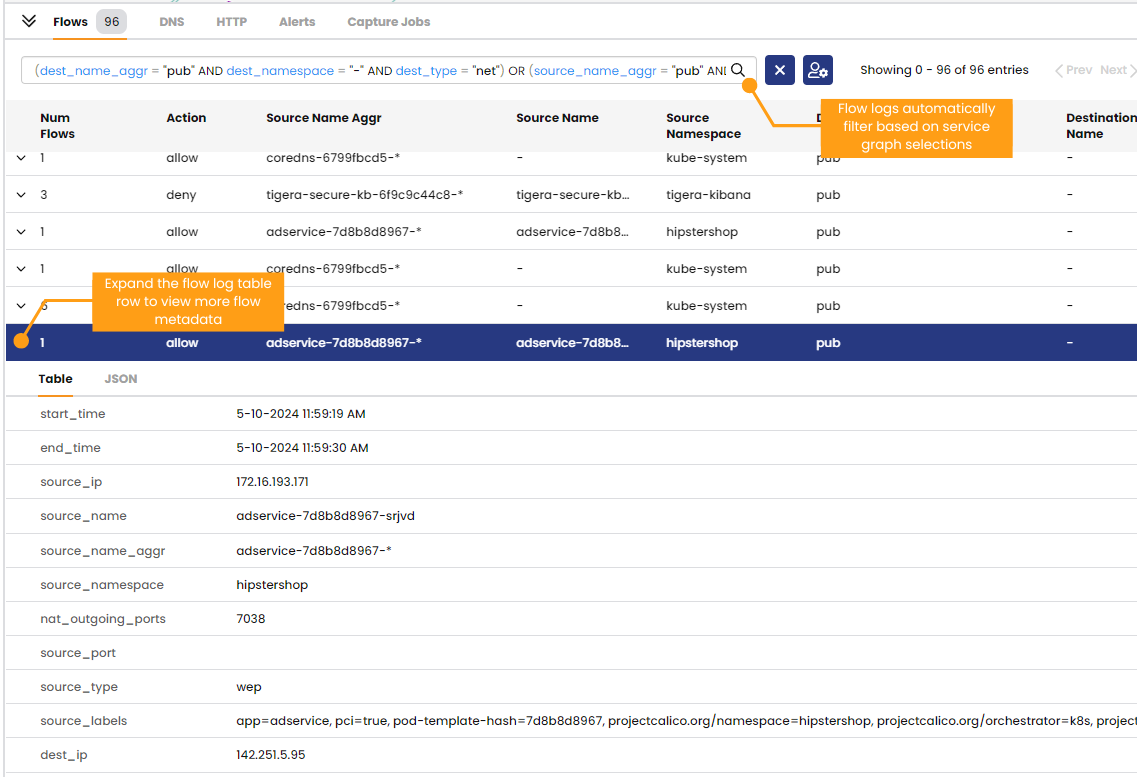
The dynamic service and threat graph also automatically filters flow logs, making it easy to view traffic flow metadata. You can use this metadata to help plan out the egress access policies that you will create, as you can be confident in the destination IP or domain, port and protocol that you will define in your network policy egress rules.
Calico Enterprise and Calico Cloud collect all the flow logs in Elastic and provide Kibana as a frontend, which provides more sophisticated querying and visualization capabilities.
You can create custom dashboards, making it easy to identify all external communications from specific clusters, namespaces, or workloads.
To see how Kibana can be used to find and filter egress traffic, watch this video.
Label assets for egress access
As Kubernetes network policies are identity-aware, egress access policies will target entities using Kubernetes labels. Labels can be used to organize and to select subsets of objects, such as a group of pods that all need to communicate with the same endpoint.
As such, before authoring any egress or DNS network policies, ensure all assets are appropriately labeled so that network policy selectors can target the correct assets. This ensures that only the necessary workloads, namespaces, or tenants are permitted the correct egress access.
When designing and applying labels, you should:
- Integrate label design into the egress access identification step
- Use label prefixes for classification to create a standardized approach.
- Consider designing appropriate key-value pairs that accurately represent the destination.
- Avoid using reserved label keys, such as
kubernetes,tigeraorcalico. - If using a CI/CD pipeline, ensure the right labels are being applied and set up label governance checks. This will ensure new deployments are appropriately secured from the beginning.
More information is available on labeling best practices.
Create network sets and policies
If you are using Calico Enterprise or Calico Cloud and intend to use network sets, create those before the network policies, because you will need to refer to them within the outbound network policies. Calico Open Source does not support domain names within network policy.
Network sets
Network sets are a way of grouping IP addresses or domain names into a centrally managed list. If you have a number of related endpoints that you’d prefer to manage outside of network policy, you may want to create a network set.
Network sets provide extra visibility into outbound traffic. Instead of seeing "public network" in flow logs or in the service graph, you will see the network set name. It is more meaningful to see names of groups of endpoints for monitoring and troubleshooting.
You can find out more about network sets in our Get started with network sets guide.
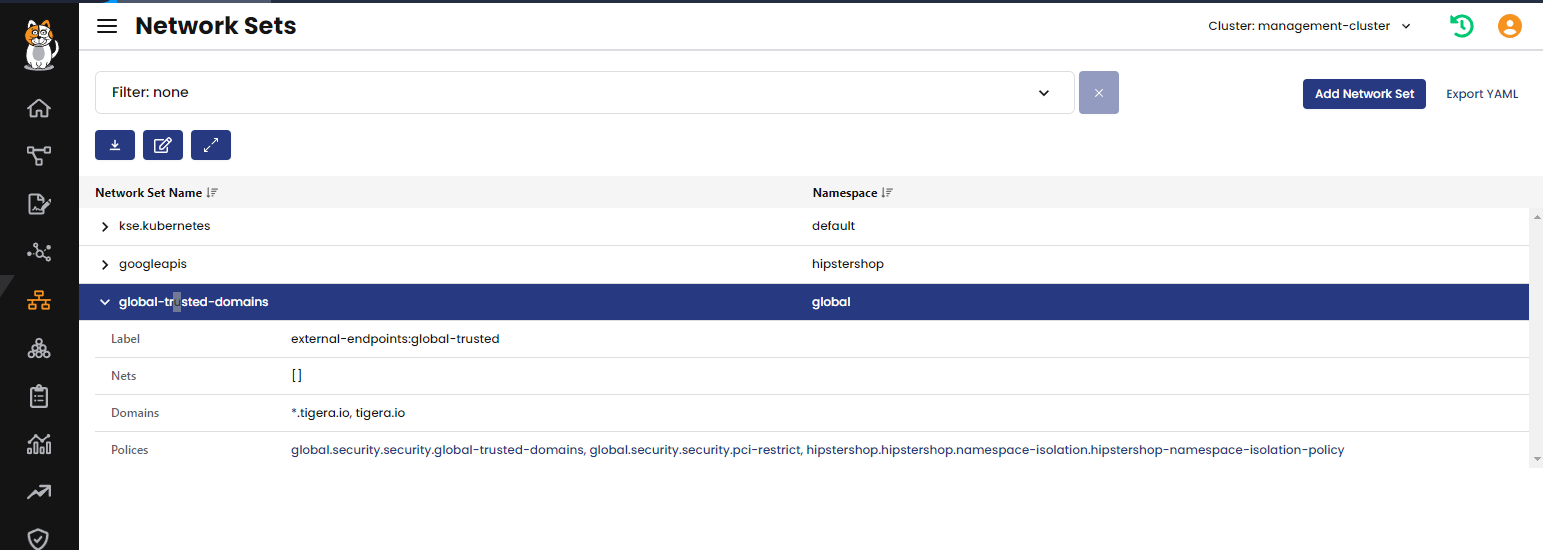
Network sets are a simple definition, as shown in the example below. This is a global network scope that includes the tigera.io domain name. Wildcards are supported in network sets.
kind: GlobalNetworkSet
apiVersion: projectcalico.org/v3
metadata:
  name: global-trusted-domains
  labels:
    external-endpoints: global-trusted
spec:
  nets: []
  allowedEgressDomains:
    - '*.tigera.io'
    - tigera.io
Network sets can be applied through kubectl or created in the Calico Enterprise or the web console. Any applied network sets will be visible there.
DNS Policies
DNS policies for egress traffic control in Kubernetes allows you to target destinations by domain name, IP address or network set.
In the policy example below you can see that access to *.twilio.com is allowed by the egress rule because it has specified that the destination is a domain name.
You can also include a list to allow access to more domain names, or include IP addresses or network sets.
The following policy example also uses labels in the spec.selector, which is where any labels created in the previous section would be used.
Any resources that match those selectors would have this policy applied to them.
apiVersion: projectcalico.org/v3
kind: GlobalNetworkPolicy
metadata:
  name: security.allow-twilio-access
spec:
  # requires security tier
  tier: security
  selector: (app == "centos" && projectcalico.org/namespace == "dev")
  order: 200
  types:
    - Egress
  egress:
  - action: Allow
    source: {}
    destination:
      domains:
      - '*.twilio.com'
Read How to use domain names in network policy for more information.
If you want to reference a network set within the egress rules of a network policy, you can do so using the labels defined when creating the network set.
The following network policy snippet references a network set in the destination section of the egress rules.
The global network policy references a global network set, using the egress.destination.selector which specifies the external-endpoints == “global-trusted” label.
  egress:
    - action: Allow
      source: {}
      destination:
        selector: external-endpoints == "global-trusted"
Read how to use network sets in network policy for more information.
Validate DNS policies by simulating egress traffic
You must ensure that egress access control is set up correctly and that only allowed destinations are communicable. Taking the time to validate your policies reduces downtime and ensures you have sufficient security coverage.
After you have all the egress access control policies in place, you can continually monitor traffic and performance to make sure your policies are behaving as you expect.
Simulate egress traffic
This can be done by using your application and testing different functionality to ensure it works as expected. Additionally, you can use pods within the application, or workloads deployed specifically for testing, with tools such as netcat or curl to simulate egress traffic. Test connections that you both would and wouldn’t expect to connect successfully after implementing policies. You can test different labels to mimic other services and test specific policies.
kubectl exec -t multitool -- sh -c 'ping -c 3 tigera.io'
kubectl exec -t multitool -- sh -c 'curl -I --connect-timeout 3 tigera.io 2>/dev/null | grep -i http'
The response can be used to determine if a network policy is correctly denying or allowing traffic to pass through, and this can be used in conjunction with flow logs or observability tools.
The simulation steps above should work as expected, or highlight any policies that need corrections.
If you’ve used a staged default deny policy, this would be the time to verify that this traffic would be denied by the policy if it were enforced. Calico Enterprise and Calico Cloud record the flow logs that include policy evaluation and the output. You can understand how the policies field is formatted and how to interpret it here. This will verify if the default deny policy is catching the simulated traffic that you expect not to be allowed. It may also highlight any egress traffic that you failed to capture correctly in a network policy.
Ongoing policy monitoring
After the initial testing and validation, you can continue to monitor your egress access controls in Calico Enterprise or Calico Cloud using the following tools.
Policies board
In Calico Cloud and Calico Enterprise, the policies board is the first place to look for misconfigurations. From here, you can spot policies that are denying traffic or that have no endpoints assigned to them because they will be highlighted red.
Observability
Calico Enterprise and Calico Cloud have tools that help you visually identify misconfigured policies and whether cluster traffic is being allowed or denied. These include Dynamic Service and Threat Graph and Kibana as a frontend for Elasticsearch. As well as being useful when identifying egress communications, they are also a valuable tool to monitor and verify that policies are working correctly.
We have a video series introducing service graph which includes an overview to identify policies denying traffic.
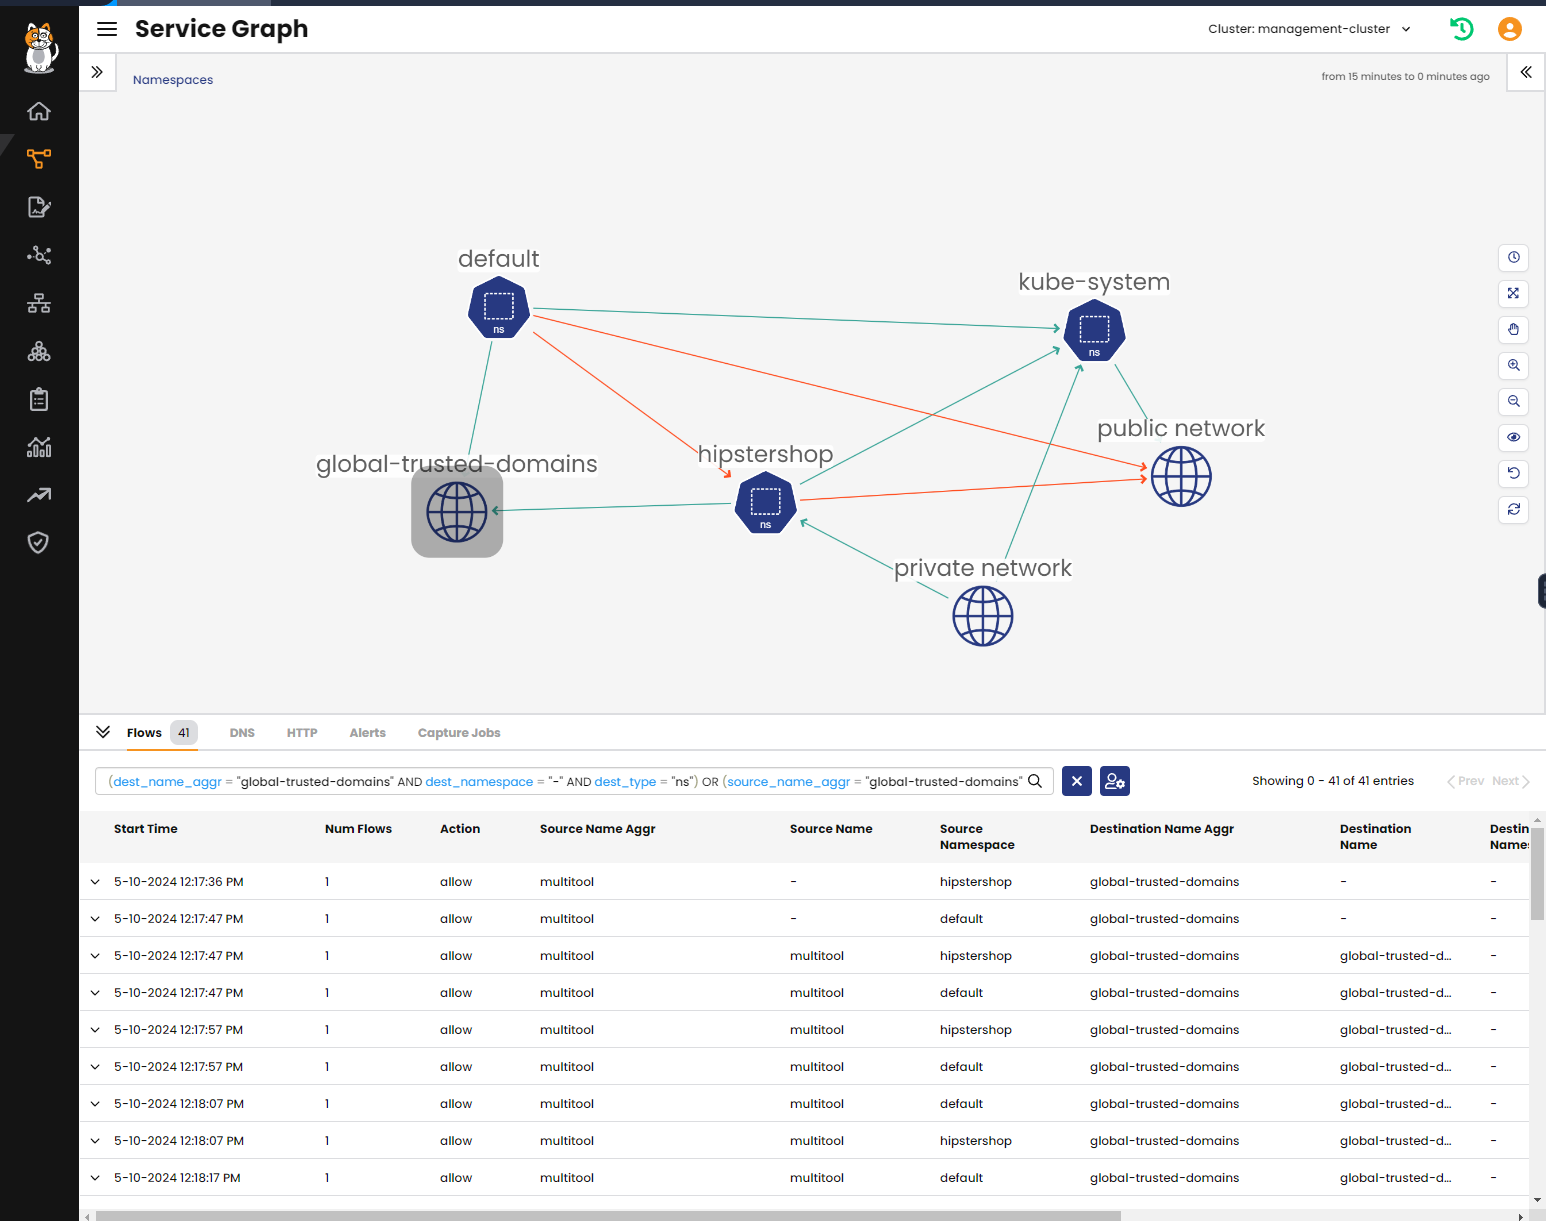
In the following screenshot you can clearly see that traffic is being denied to the public network, and allowed to the global-trusted-domains network set.
If a default-deny policy is in place isolating the cluster for egress, but another policy is allowing traffic to trusted domains that are listed in the global-trusted-domains network set, the dynamic service and threat graph lets you visually confirm if the network traffic is expected.
The denied flows (red lines) will be simulated egress flows testing network policies.
Kibana
Kibana is incredibly powerful if you create purpose-built egress traffic dashboards. If you used Kibana when identifying egress traffic in the early step of authoring DNS policies, you can use the same visualizations to validate and monitor egress network traffic.
We have a video series that includes an overview into using flow logs for observability and troubleshooting.
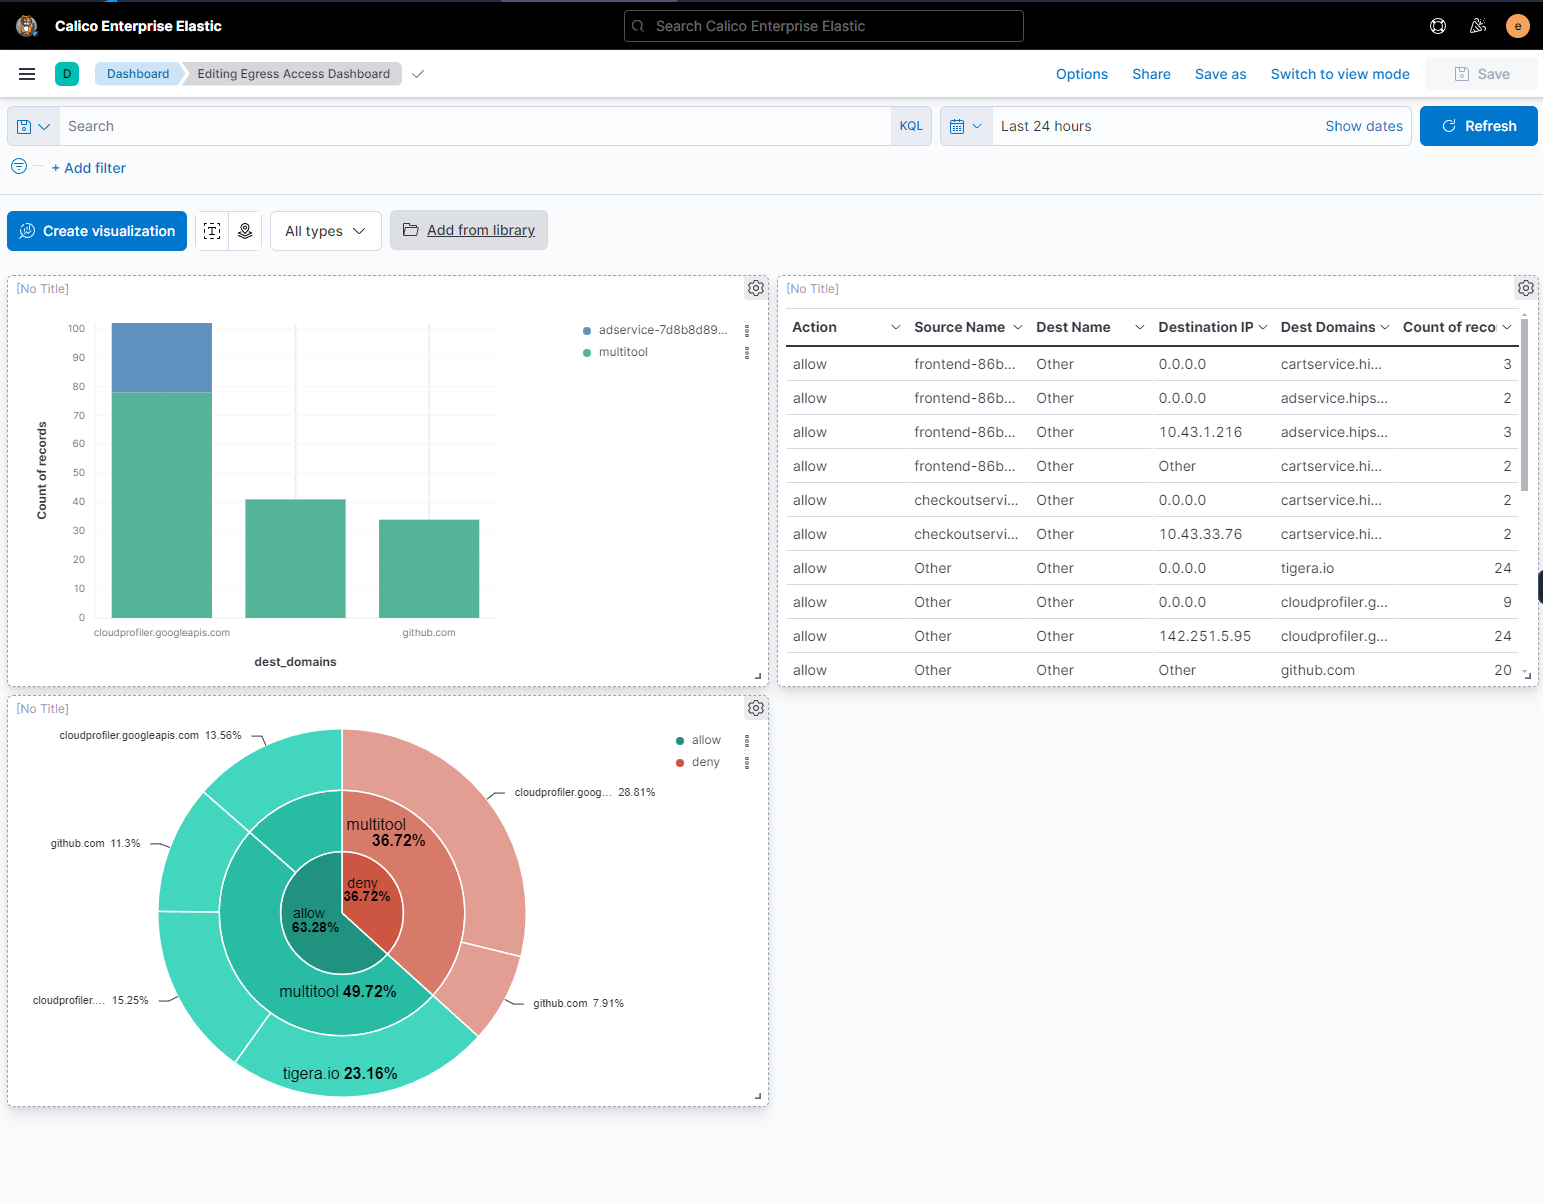
You can create custom visualizations that make it easy to identify the destination of egress traffic, what the action is, and what the source of egress traffic is. You can also include policy information to show which policies are allowing or denying egress traffic from your cluster.
The dashboard below shows a few visualizations. The bar graph shows the number of requests to unique external domains, broken down by source. The table shows all egress traffic from specific namespaces and includes egress traffic that remains within the cluster (east-west) as well as traffic leaving the cluster (north-south). The pie chart breaks down traffic by action, and splits the records by source workload and then destination domain.
Read the logs
Calico supports a log action for its network policies, which will be useful for Calico Open Source. Calico Enterprise and Calico Cloud can collect a wide range of logs that can be used to investigate flows and validate policies. You can watch an introduction to the flow log dashboard here or view the flow, DNS, and HTTP logs through the dynamic service and threat graph.